 Home >
Guides >
Building Battlefields | Basic Game | Master Game | Glossary
Home >
Guides >
Building Battlefields | Basic Game | Master Game | Glossary
Compiled Battlefield Building Guide
This Guide separates and compiles any Building instructions from the various rulebooks that come with the Master Sets and Terrain Sets. It has been slightly edited mainly to blend in (sometimes reworded and elaborated) text from the 2010-09 FAQ that contains errata and important clarifications. This Guide is not intended for building battlefields used in official organized play supported by Renegade Game Studios.
Skip Ahead To:
- Road to the Forgotten Forest
- Volcarren Wasteland (Lava Fields)
- Thaelenk Tundra (Snow Fields)
- Fortress of the Archkyrie
- The Conflict Begins
- Swarm of the Marro
- Ticalla and Laur Jungles
- Battle for the Underdark
Tiles
The hex-shaped tiles come in various sizes and colors. You’ll link them and stack them as shown in the build instructions for a battlefield, like The Forsaken Waters, for example. See the Terrain table for the symbols used on Gary's Heroscape Site to represent tiles and other terrain pieces. The illustrations below show how to link and stack tiles. Note: You can stack water tiles on land tiles (like grass, rock or sand) but do not place any terrain pieces on water tiles, including other water tiles. This also applies to all other non-land tiles, like Molten Lava and Ice, for example.
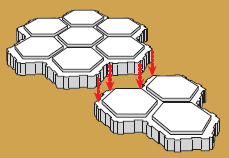 EXAMPLE 1: Linking
Slide the notches into the grooves, as shown. Don’t try to snap them together.
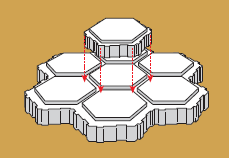 EXAMPLE 2: Stacking
Fit one tile on top of another as shown.
Road to the Forgotten Forest
Roads
Building with Road Tiles: Road Tiles come in single-hex, double-hex, and five-hex tiles. You can link and stack them the same way as any other tile to create road spaces on your battlefield.
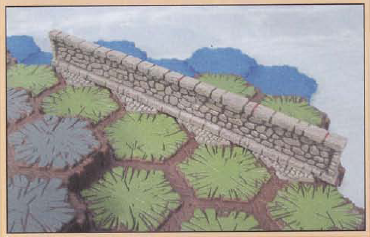
Stone Walls
Building with Stone Walls: You may build a bridge by combining 2 stone walls with a 5-hex road tile, you may use stone walls together to create a long wall, or you may use them alone on different parts of the battlefield as you see fit.
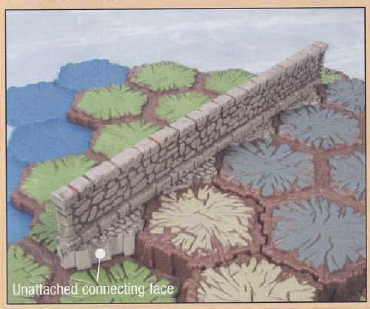
A stone wall must be placed on the battlefield with each of the 8 connecting faces attached to hex tiles. See Examples 3, 4 and 5.
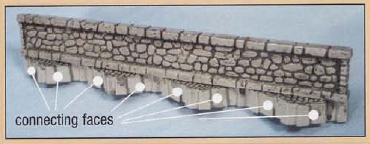 EXAMPLE 3: Connecting Faces
 EXAMPLE 4: Stone Wall placed correctly
This stone wall is placed correctly because all 8 connecting faces are attached to
hex tiles.
 EXAMPLE 5: Stone Wall placed incorrectly
This stone wall is placed incorrectly because a connecting face is not attached.
Evergreen Trees (or Snowy Evergreen Trees)
Evergreen trees may be placed onto any spaces where they fit. You may not place them on a space(s) that does not have a hex interlock. For example, you cannot place trees on water tiles because the water tile(s) does not have a hex interlock.
Volcarren Wasteland (Lava Fields)
Molten Lava
Building with Molten Lava Tiles: You can link them and stack them on any non-water, non-molten lava tiles to create molten lava spaces on your battlefield. You cannot place glyphs or treasure glyphs on molten lava spaces.
Lava Fields
Building with Lava Field Tiles: Lava field tiles come in single-hex, double-hex, and seven-hex tiles. You can link them and stack them the same way as any other tile to create lava field spaces on your battlefield.
Lava Rock Outcrops
Building with Lava Rock Outcrops: A Lava Rock Outcrop must always sit on a Lava Rock Outcrop Base when placed on the battlefield. Lava Rock Outcrops with Bases may be stacked on any terrain such as grass, rock, sand, or dungeon. Do not stack them on terrain such as water spaces, shadow spaces, or any other terrain that is considered to have no height.
Building with Lava Rock Outcrop Bases: Lava Rock Outcrop Bases may be used alone, without a Lava Rock Outcrop, to represent additional molten lava spaces. Lava Rock Outcrop Bases cannot be stacked on water spaces, shadow spaces, or other tiles that are considered to have no height.
Thaelenk Tundra (Snow Fields)
Ice
Building with Ice Tiles: You can link and stack them the same way you link and stack water tiles. Ice Tiles cannot be stacked on water, other Ice Tiles, or other tiles that are considered to have no height.
Snow
Building with Snow Tiles: You can link and stack them the same way you link and stack other terrain tiles such as grass, sand and rock tiles. Snow Tiles cannot be stacked on water, ice, or other tiles that are considered to have no height.
Glacier Mountains
Building with Glacier Mountains: A Glacier Mountain must always sit on a Glacier Base when placed on the battlefield. Glacier Mountains with Bases may be stacked on terrain such as grass, sand and rock tiles. Do not stack them on water, ice, or other tiles that are considered to have no height.
Building with Glacier Bases: Glacier Bases may be used alone, without a Glacier Mountain, to represent ice spaces. Glacier Bases cannot be stacked on water, ice, or other tiles that are considered to have no height.
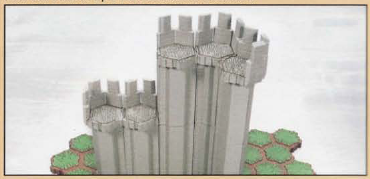
Fortress of the Archkyrie
Fortress Walls
Fortress Walls, Wall Walks, and Battlements: Fortress Walls are made up of Wall Sections, Bases, and Wall Walks and may be built in a variety of ways. They may be built as single-wall height, double-wall height, or even higher. Bases are used to connect the Wall Sections to the battlefield. Wall Walks are spaces that sit on top of Wall Sections and allow figures to move on and occupy the top of walls. Battlements may be placed on Wall Walks or terrain spaces for figues to hide behind during battle.
How to build Fortress Walls: Fortress Walls may be built on any normal terrain such as grass, sand, rock, etc. Stack a Straight, Corner, or End Base on the terrain space where you wish to build. Then stack the matching Wall Section on top of the base, snapping the pieces together for a tight fit. You may place another matching Wall Section on top to build it higher, or place a Wall Walk on top to end the build. You may link Battlements on the sides of the Wall Walks for added protection. See Examples 6, 7, 8 and 9.
When building Fortress Walls, follow these rules below:
- Each Wall Section must sit on a Base or another Wall Section
- Each Wall Section must have a Wall Walk or another Wall Section on top of it.
- Fortress Walls may not sit on water tiles or other tiles considered to have no height.
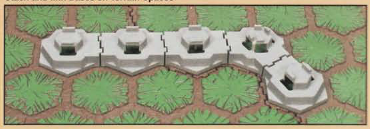 EXAMPLE 6: Placing Bases
Stack and Link Bases on Terrain Spaces.
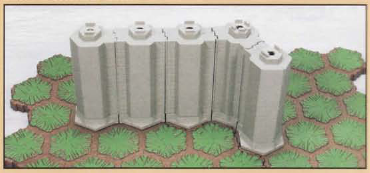 EXAMPLE 7: Adding Walls
Attach Wall Sections to Bases.
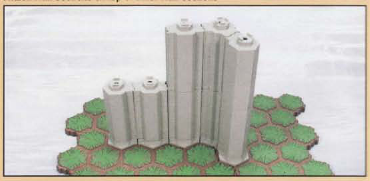 EXAMPLE 8: Building Higher Walls
Attach Wall Sections on top of other Wall Sections.
 EXAMPLE 9: Adding Wall Walks and Battlements
Place Wall Walks on top of Wall Sections with Battlements.
Battlements
Battlements are structures that may be added to Wall Walks or hex-shaped tiles such as grass, rock or sand. Battlements offer valuable protection during battles by providing figures with obstacles to hide behind.
The Doorway
The Doorway allows figures to enter and exit a Fortress. Attached to the Doorway is a moveable Door that may be opened and closed. The Doorway may be placed anywhere on the battlefield as long as the Doorway and all of the Doorway Spaces (1-4) are all on the same level. When building battlefields, keep the 4 Doorway Spaces clear of any obstacles such as ruins or trees. Only figures are allowed to occupy the 4 Doorway spaces. See Example 10.
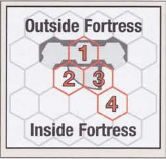 EXAMPLE 10: The 4 Doorway Spaces
Ladders
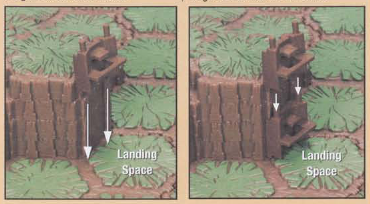
Building a Ladder: Build a Ladder by combining 1 or more Single-Rung Ladder Pieces, stacking them together one on top of another, and linking them to a Wall Walk, Fortress Wall or other hex-shaped tiles. Only one Ladder may be built on a hex-shaped tile space such as grass, rock, sand, etc. This space is called the Landing Space. The bottom Single-Rung Ladder Piece must always be placed dirrectly on the Landing Space. Landing Spaces cannot be water spaces or other similar spaces considered to have no height. Ladders must always be linked into the side of a Wall Walk, Fortress Wall or other hex-shaped tiles. The Single-Rung Ladder Piece at the top of every Ladder must always be connected to a Wall Walk, Fortress Wall or hex-shaped tile. See Examples 11 and 12.
 EXAMPLE 11: Building Ladders
Stack multiple Ladder Rungs together to allow access to higher levels.
1. To attach Ladders to Wall Walks or hex-shaped tiles: Slide the notches into the
grooves (left picture).
2. To create longer Ladders: Place one Ladder piece on top of another to build longer
Ladders (right picture).
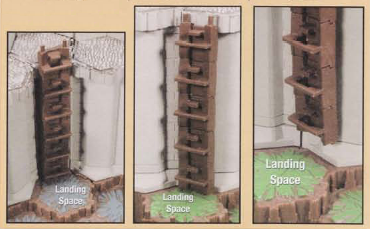 EXAMPLE 12: Correct and incorrect Ladder placement
Correct: The Single-Rung Ladder Piece at the top of this Ladder is connected to the
Wall Walk tile, and the bottom rung is placed on the Landing Space (left picture).
Incorrect: This Ladder is not correctly linked into the side of the Wall Walk (middle
picture).
Incorrect: The bottom rung of this Ladder is not placed directly on its Landing Space
(right picture).
The Flag
The Flag may be placed on the top of any Battlement as shown in Example 13.
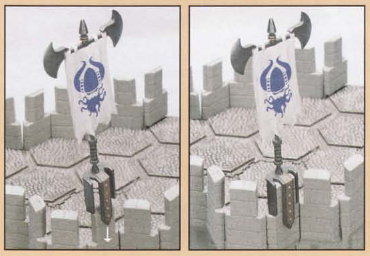 EXAMPLE 13: Flag placement
Attach the Flag by sliding it onto a Battlement from the top (left picture).
Flag properly placed (right picture).
The Conflict Begins
Warehouse Ruin
Only figures can occupy the two hex-shaped spaces located on the Warehouse Ruin Upper Floor Level. These two spaces are used in the same way as any other space, except that no tile pieces may be built directly onto the Warehouse Ruin Upper Floor. See Example 14.
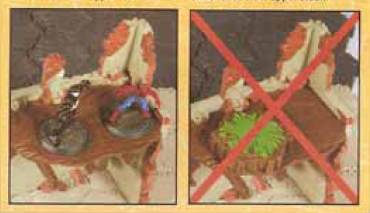 EXAMPLE 14: Using the Warehouse Ruin Upper Floor Level
Spider Man and Venom use their Swing Lines to reach the Warehouse Ruin Upper Floor
(left picture). Tiles can never be placed on the Warehouse Ruin Upper Floor (right
picture).
Swarm of the Marro
Marro Hive
When placing the Marro Hive, it is always placed on its 6-hex swamp water tile base. When placing the 6-hex swamp water tile base, you cannot create an overhang (no empty space can be under the base). The 6-hex base can only be placed on land tiles.
Ticalla and Laur Jungles
Jungle Pieces (Palm Trees, Jungle Trees and Underbrush)
Assembling a Palm or Jungle Tree: To attach a canopy to a Palm or Jungle Tree, insert the canopy into the top of the Palm or Jungle Tree’s trunk. The two three-layer Palm canopies attach to the 14 and 15 height Palm Trees. The four-layer Palm canopy attaches to the 16 height Palm Tree.
Building with Jungle Pieces: Each Jungle Piece occupies one single hex space. Jungle Pieces may be placed adjacent to tiles or on top of tiles. When placed, a Jungle Piece must have two or more of its six connecting faces attached to other hex tiles. For example, a Palm Tree may attach to a Swamp Water tile, a Sand tile, and another Jungle Piece. See Examples 15 and 16.
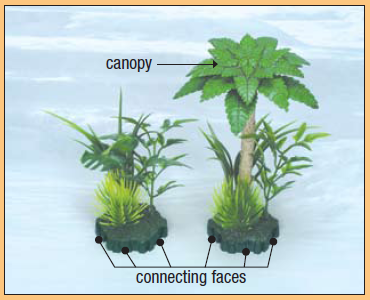 EXAMPLE 15: Connecting Faces
 EXAMPLE 16: Placing Jungle Pieces Correctly
The Palm Tree and the far right Underbrush are correctly placed because two or more
of their connecting faces are attached to hex tiles. The center Underbrush is incorrectly
placed because only one of its connecting faces is attached to a hex tile.
Battle for the Underdark
Rock Outcrops
Building with Rock Outcrops: A Rock Outcrop must always sit on a Rock Outcrop Base when placed on the battlefield. Rock Outcrops with Bases may be stacked on any terrain such as grass, rock, sand, or dungeon. Do not stack them on terrain such as water spaces, shadow spaces, or any other terrain that is considered to have no height.
Building with Rock Outcrop Bases: Rock Outcrop Bases may be used alone, without a Rock Outcrop, to represent additional shadow spaces. Rock Outcrop Bases cannot be stacked on water spaces, shadow spaces, or other tiles that are considered to have no height.