 Home >
Guides >
Building Battlefields | Basic Game | Master Game | Glossary
Home >
Guides >
Building Battlefields | Basic Game | Master Game | Glossary
Compiled Master Game Guide
This Guide separates and compiles any Master Game instructions from the various rulebooks that come with the Master Sets and Terrain Sets. It has been slightly edited mainly to blend in (sometimes reworded and elaborated) text from the 2010-09 FAQ that contains errata and important clarifications. This Guide is not intended for use in official organized play supported by Renegade Game Studios.
Objective: Create a battlefield and choose your Army, then fight the battle of all time! To win, be the first to achieve your Victory condition. Some Scenarios demand more from you than mere destruction, so be sure to read them carefully and plan your strategy around the battle at hand.
For First-Time Players: If this is your first time playing the Master Game, we recommend that you set up the Table of the Giants battlefield and play the Clashing Fronts game scenario.
Skip Ahead To:
- Moving / Engagement
- Attacking
- Glyphs / Special Powers
- Rise of the Valkyrie
- Road to the Forgotten Forest
- Volcarren Wasteland (Lava Fields)
- Thaelenk Tundra (Snow Fields)
- Fortress of the Archkyrie
- The Conflict Begins
- Swarm of the Marro (Swamps)
- Ticalla and Laur Jungles
- Battle for the Underdark
- Battle for the Wellspring
- Age of Annihilation
Get Ready to Play
1. SET UP YOUR BATTLEFIELD
To do this, choose a Master Game Scenario and build the battlefield that goes with it. After you’ve played a few ready-made games, you may want to create your own battlefields and scenarios.
Playing as a team: You can play scenarios with a teammate. The additional rules for doing this are here.
Playing with Multiple Master Sets and/or Expansion Sets: There are a few additional rules for doing this here.
About the Army Cards
In this game, you’ll use the Master Game side of the Army Cards (shown below).
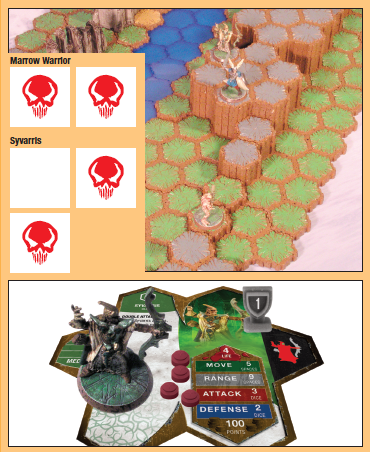
As in the Basic Game, each Army Card features either a Hero or a Squad, with Move, Range, Attack and Defense Values. But you’ll notice that the Master Game side of each card has much more information about the figure(s). As you play, you’ll become more familiar with how all of this information is used during gameplay. Example 1 explains the Army Card information.
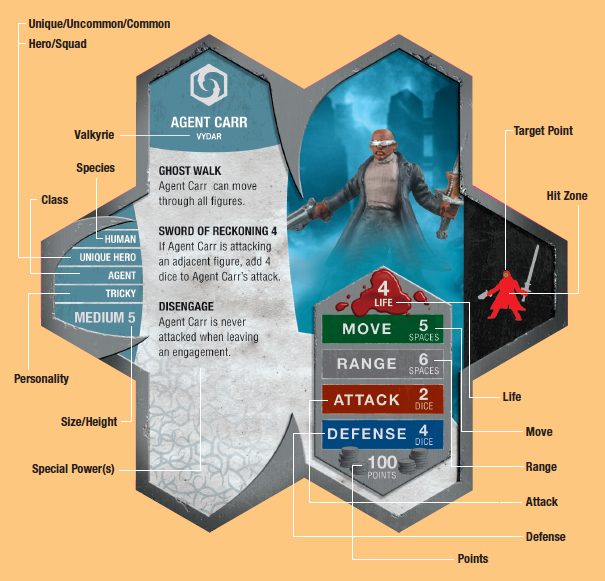 EXAMPLE 1: Your Army Cards (Master Game Side)
Unique/Uncommon/Common: Unique Army Cards– When selecting cards to put in your Army, you cannot select two
of the same Unique Army Card. Common Army Cards and Uncommon Army Cards– When selecting
cards to put in your Army, you can include two or more of the same Common or Uncommon
Army Card. Note: Uncommons were introduced in the "Battle for the Underdark" master set by Wizards
of the Coast, and have not (yet) been continued by Renegade Game Studios.
Hero/Squad: Hero Cards feature a single figure. Squad Cards feature two or more figures who act
together. Your Army may include all Heroes, all Squads, or any combination.
Valkyrie: The Valkyrie General who the figure(s) on this Army Card serve.
Species: Biological classification of the figure(s).
Class: The type of figure(s).
Personality: Dominant behavior.
Size/Height: The overall weight category, and the number of levels tall the figure(s) are.
Special Power(s): Most figures have one or more special powers that allow them to go above and beyond
standard moving, attacking and defending.
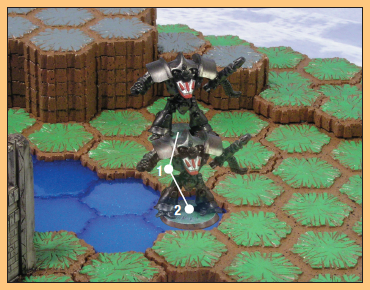
Target Point: The green dot shows where you determine Line of Sight from on each figure.
Hit Zone: The red area shows what part of the figure(s) can be attacked. Used when determining
Line of Sight.
Life: The number of wounds it takes to destroy each figure.
Move: The maximum number of spaces the figure(s) may move.
Range: The number of spaces away that the figure(s) may attack.
Attack: The number of dice you roll for the figure(s)' normal attack.
Defense: The number of dice you roll when the figure(s) defend.
Points: The cost of drafting this Army Card and its figure(s) into your Army.
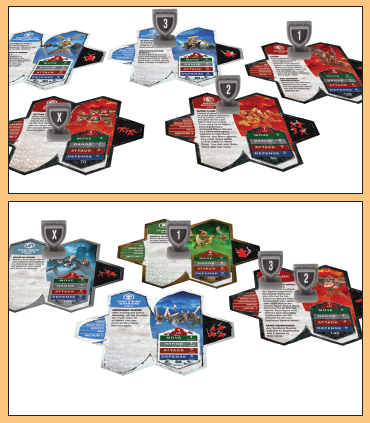
2. GATHER AND PLACE YOUR ARMY
For the Master Game Scenarios, you can use a pre-set Army or a premade Army, or you
can draft an Army. These three ways of gathering an Army are explained below.
As you gather your Army, make sure that the total Points Cost doesn’t exceed the Points Cost limit listed for the Scenario you chose. It can be lower, but not higher. Players don’t need to have the same number of Army Cards. For example, you might have three Army Cards, while an opponent has four or five Army Cards. This is okay.
Army Card colors: In the Master Game, the complexities of the characters and their allegiances are on full display. Therefore, your Army can include Army Cards of mixed colors.
Using a Pre-Set Army
Some Scenarios specify the Armies to use. As in the Basic Game, you choose which pre-set
Army you want to control. After choosing your Army, place your Army Cards in front
of you, then place your figures on the battlefield where shown in the Scenario.
Using a Premade Army
Experienced players may know exactly which Armies they want, based on the game scenario,
the Points Cost, their favorite figures, or other factors. If both players agree,
they may both supply custom premade Armies with Points Cost totals equal to or less
than the Scenario’s Point Cost limit. If you’ve already chosen (or brought along)
your Army, place your cards in front of you. Then players roll the 20-sided die to
see who places their Army on the battlefield first. Reroll ties. The highest roller
will place their entire Army first; placement then passes to the left.
Placing your Army in the starting zone: You must place your entire Army in one of the Scenario’s same-color starting zones. You cannot place any figures in an enemy-occupied starting zone. If you are combining sets and playing with three or more players, unless stated otherwise in the Scenario, teammates start in the same starting zone. If your Army (including figures that do not start on the board) consists of more spaces (counting 2 spaces for each double-space figure) than the scenario allows in your given starting zone, you must remove figures from your Army until the number of spaces your Army consists of matches, or is less than the number of starting zone spaces.
Drafting an Army
Drafting is a fun way for players to interact and share figures while building their
Armies, by taking turns choosing which Army Cards they want to include in their Army
from a shared pool of figures. When you select an Army Card, take the figure or figures
shown on the card and place them in a starting zone immediately, before the next player
selects an Army Card. You must place your entire Army in the same starting zone (see above).
For a two-player game, players draft as follows:
- Both players roll the 20-sided die, re-rolling any ties. The player who rolls higher drafts first, by choosing one Army Card.
- The other player then chooses two Army Cards.
- Taking turns, each player then chooses one Army Card at a time until they reach the Points Cost limit, or until no additional figures can be chosen.
For a three- or more-player game, players draft as follows:
- All players roll the 20-sided die, re-rolling any ties. The player who rolls the highest drafts first, by choosing one Army Card.
- The player to the left then chooses one Army Card, and so on. The last player to draft chooses two Army Cards.
- Drafting goes back around the table in reverse direction. The last player (the player who drafted first) chooses two Army Cards. The draft reverses direction again.
- If at any time a player cannot pick another Army Card because choosing it would exceed the total Army Point Cost limit, that player must pass. If you pass, you have completed your Army.
- Continue going back and forth around the table, with the last player in each direction choosing two Army Cards and reversing the draft direction, until all players have completed their Armies.
Let’s say you’re playing the two-player Clashing Fronts Game Scenario on the Table of the Giants battlefield. This game calls for each player to gather a 400-point Army. Example 2 shows the Armies that you and your opponent chose, and where you placed them.
 EXAMPLE 2: You Gather and Place Your Armies
Your Army: You chose this Army for a 400-point total, and placed them where shown. Grimnak (the
most powerful) is in front.
Your Opponent’s Army: He chose this Army for a 390-point total, and placed them in their starting zone
as shown. Syvarris and Deathwalker (figures with long Ranges for attack) are in the
forefront.
Friends and Enemies
All figures represented by Army Cards in your Army are “friendly” figures. All figures
represented by Army Cards in your opponent’s Army are “enemy” figures. In multiplayer
games that support teams, figures in your allies’ Armies are also friendly figures.
Note: only figures represented by Army Cards in YOUR Army are figures “you control”.
If you are playing with a teammate, any effects that target figures you control do
not affect your teammate.
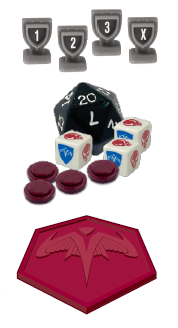 ORDER MARKERS
Each player takes four Order Markers: 1, 2, 3, and X. In each round, you’ll place
these markers on your Army Cards to mark the order in which your figures will move
and attack.
WOUND MARKERS AND DICE
Place all of the wound markers, 20-sided die and combat dice near the battlefield.
The combat dice are used as attack dice when rolling for skulls, and also as defense
dice when rolling for shields.
GLYPHS
Glyphs are magical enchantments that can grant unique and powerful abilities when
a figure lands on them. Some Scenarios call for Glyphs to be placed on certain spaces.
See Glyphs, here.
The Battle Begins!
The game is played over several rounds. A round consists of 3 turns for each player.
A ROUND OF PLAY
The Round Marker Track: Most Game Scenarios feature a numbered line where players keep track of the rounds
they’ve played. Before starting the first round, place the black Round Marker on the
"1". At the end of each round, move the Round Marker ahead to the next number.
Each round of play consists of the following four steps:
- Place Your order markers
- Roll for initiative
- Players take their turns one at a time, until each player has taken three turns.
- Move the round marker ahead to the next number.
All of these steps are explained in detail below.
1. PLACE YOUR ORDER MARKERS
On a turn, you’ll move and attack with the figure(s) on one Army Card. Decide now
which Army Card you’ll use on which turn, then place an order marker on those cards
(1 for the first turn, 2 for the second turn, and 3 for the third turn). You may place
two or more order markers on the same card, if you want to use that card for two (or
even all three) of your turns.
Players place their markers at the same time. Place your markers with the numbers facing you, so your opponents can’t see them. (In games with more than two players, teammates can look at each other's Order Markers.)
The “X” order marker: This extra marker is not used on any of your turns; it is only a decoy to prevent your opponents from knowing which three order markers you actually intend to use.
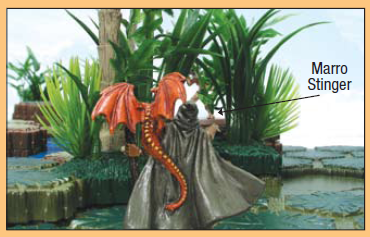
If your Army includes two or more of the same Common Army Card, you don’t need to keep these figures separate (that is, keep track of which figures belong to which card). For example, if you’re using two cards’ worth of Marro Stinger figures, each order marker placed on either Army Card activates any three of them.
Uncommon Army Cards, however, are unique to each figure, so you must keep track of which figure belongs to which Army Card. You can use colored stickers to track which Uncommon figure belongs to which Uncommon Army Card.
Note: More competitive players can take turns placing all of their markers. To do this, roll the 20-sided die. The high roller places all of his order markers first; then the player to the left places all of his order markers; and so on, until all order markers have been placed.
Example 3 shows how you and your opponent might place your Order Markers.
 EXAMPLE 3: You Place Your Order Markers
Your Order Markers: On this round, you decide to mobilize Grimnak (first turn), your Marro Warriors (second
turn), then Finn (third turn). You place the X Order Marker on the Zettian Guards,
to “fake out” your opponent.
Your Opponent’s Order Markers: On this round, your opponent decides to mobilize his two figures with long attack
Range: Syvarris (first turn), then Deathwalker (second and third turns). He places
the X Order Marker on his Krav Maga Agents.
2. ROLL FOR INITIATIVE
After placing Order Markers and before turns begin, each player rolls the 20-sided
die for initiative. The player with the highest roll will get to take each of his
turns first. Play then passes to the left. If there’s a tie for highest roll, the
tying players re-roll.
For example, Dan, Ben, and Mike are playing. Dan rolls a 2, Mike rolls a 15, and Ben rolls a 17. For the first turn (using order marker 1), Ben will go first; then play will pass to the left until all three players have played their first turns. Because he won initiative, Ben will then take his second turn (using order marker 2) before Dan and Mike. The round ends after each player has taken three turns. The players will again place their order markers and roll for initiative for the next round.
3. ON YOUR TURN
During a round, each player will take three turns. Usually, you’ll do three actions
on your turn, in this order:
Action 1. Reveal your Order Marker (Always)
Action 2. Move Figure(s) shown on the Army Card (Optional)
Action 3. Attack with Figure(s) shown on the Army Card (Optional)
All three of these actions are explained in detail in the following sections.
Action 1. Reveal your Order Marker (Always)
Start your turn by revealing your order marker for that turn, then laying it number-side
up on the Army Card. Note: Later in the game, it’s possible that the figure(s) on that Army Card will have been
destroyed earlier in the round. In such a case, your turn immediately ends.
Action 2. Move Figure(s) shown on the Army Card (Optional)
Now you may move any or all figures on your chosen Army Card, if you want to. Follow
these rules for moving each figure:
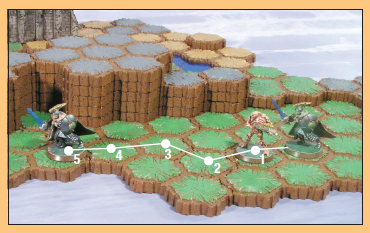
- Check the Move number: You can move a figure in any direction up to the Move number on its Army Card, changing direction at will. For example, with a Move number of 5, a figure can move 0, 1, 2, 3, 4 or 5 spaces. (Uneven terrain and water may limit their movement, as you’ll soon see.) Example 4 shows basic movement. Note: You do not need to slide a figure's base along the surface of the terrain. What is important is that it fits on each space (which will be explained in more detail). You may lift it off the battlefield between spaces as it "steps" from one space to the next, making sure the base comes in contact with and can lay flat on each space.
- Order of movement: Move Squad figures in any order, one at a time.
- Passing and landing on other figures: You can move through a space with a friendly figure on it (one of your own or a teammate’s) unless the figure is engaged (see Engagement Rules here). You can’t move through a space with an opponent’s figure on it, or end your move on a space with any other figure. Note: You cannot move or touch your opponent’s figures. Your figure can’t move through or onto a space that it can’t fit completely onto. So if an opposing Grimnak’s tail is blocking your figure from standing on a space, you can’t move there.
 EXAMPLE 4: Basic Movement
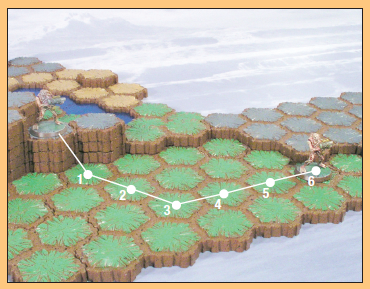
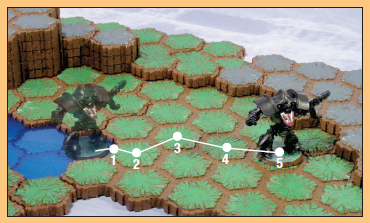
Finn has a Move number of 5. You advance him the full 5 spaces toward the opposing
figures. Note: Finn may move through the Marro Warrior because it is friendly.
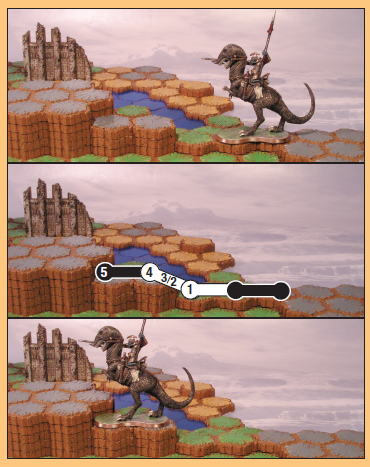
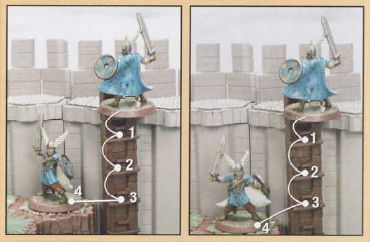
- Moving up: When you move to a higher level, count the side of each higher level as one space, as well as the space you land on. Example 5 shows how to do this. If your figure can’t move enough spaces to reach the top of a ledge, then it can’t move there.
- Note: Glyphs and water tiles do not add height to any spaces on which they’re placed.
 EXAMPLE 5: Moving Up
Count the side of each level as you move Finn to the top of the first ledge. Note: Finn cannot move to the top ledge because it would take a move of 7, and his Move
number is only 5.
- Height limit: A figure cannot move up a number of levels equal to or higher than its Height number (height) all at once. See Example 6.
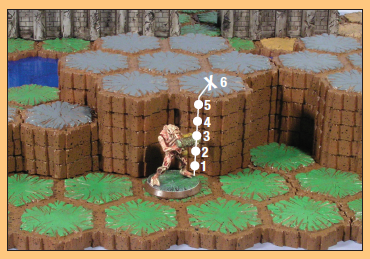 EXAMPLE 6: Height limit for moving up
This Marro Warrior cannot move up to the space marked with an “X” because it would
be moving up 5 levels, which is equal to or higher than the Marro Warriors’ Height number of 4.
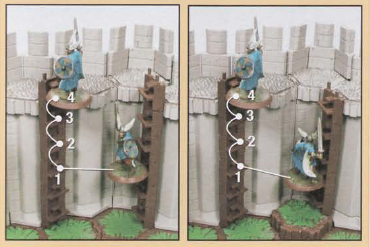
- Moving down: When you move to a lower level, you don’t need to count sides on the way down, but there may be a penalty for moving to a much lower level (see Falling, below). Example 7 shows a figure moving down.
 EXAMPLE 7: Moving Down
To move a Marro Warrior down from this ledge, you don’t need to count the sides of
the levels.
- Falling: When a figure moves down to a much lower level, it might get wounded. Falling does not stop a figure’s movement, but it could wound or destroy it. Note: Falling rules do not apply if a figure falls onto a water space. A figure can fall onto a water space from any level.
- A fall is defined as follows:
- If a figure moves down onto a level that is equal to or greater than the figure’s height, you must roll one combat die immediately to see if it was wounded.
- Major fall: If the fall is 10 or more levels greater than the figure’s height, you must roll 2 additional dice (for a total of 3 dice).
- For each skull you roll, add one wound marker to the figure’s Army Card. (See Life, here.)
- Extreme fall: If the fall is 20 or more levels greater than the figure’s height, you must roll the 20-sided die. If you roll 19 or 20, the figure survives without taking any falling damage. If you roll 1–18, the figure is destroyed.
- Example 8 shows a figure falling.
 EXAMPLE 8: Falling
When you move a Marro Warrior down from this 5-level cliff, you roll one attack die
for the fall, because the cliff is equal to or greater than its Height number of 4.
You don’t roll a skull, so the warrior is safe.
- Moving onto water: When you move onto a water space from any other space (even from another water space), you must end your move there. See Example 9. Note: Double-space figures can move past one water space that’s between two non-water spaces without stopping; they must stop only if they move onto two same-level water spaces. A double-space figure with its leading half on a water space, cannot move to another water space on a different level, because it cannot end its movement on uneven terrain. (See "Moving double-space figures" below)
 EXAMPLE 9: Moving onto water
When your opponent moves Deathwalker onto a water space, he must stop there.
- Moving from water to land: Water tiles do not add a level to the spcace they are placed on. For water spaces that are lower than their adjacent land spaces, the “moving up” rule applies. When moving from water to land, count the side of each land space as you move. See Example 10.
 EXAMPLE 10: Moving out of water
When moving Deathwalker from the starting water space up onto the adjacent land space,
you count 2 spaces because the water is considered a level lower than the land space.
- Moving double-space figures: Some figures, such as Grimnak or Mimring, take up two spaces. When moving a double-space figure, decide which half to lead with. Then move the figure so that the other half follows the same spaces that the leading half just occupied. Always end a double-space figure’s move on two same-level spaces. Example 11 shows how to move a double-space figure.
- Note: Glyphs and water tiles do not add height to any spaces on which they’re placed. Because of that, a double-space figure can have one half on a land space and one half on a glyph or water tile placed on top of an adjacent space of the same level. They are considered to have the same height as the space below.
 EXAMPLE 11: Moving double-space figures
From his starting spaces (top picture), Grimnak moves 5 spaces head first (one half), with his hind section (the other half) trailing along the same spaces as his front section (middle picture). Counting the
sides of the ledge, Grimnak ends his move at the top, on two same-level spaces (bottom
picture).
- Flipping a double-space figure: Anytime during a double-space figure’s move, you can flip it. To flip a double-space figure, turn the figure around while keeping it on the same two spaces. After flipping, you can choose a new leading half. The flip is free: It does not count as part of your move. The double-space figure does not take any leaving engagement attacks when flipping, since the figure is staying on the same two spaces. Leaving engagement attacks are explained later.
- Obstacles: Barriers such as walls and trees are known as “obstacles”. A figure cannot move onto or through an obstacle’s space. If a specific obstacle has additional rules, those rules will be defined in the rulebook that accompanies the obstacle.
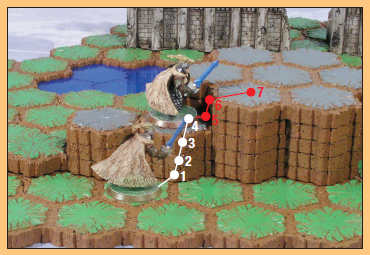
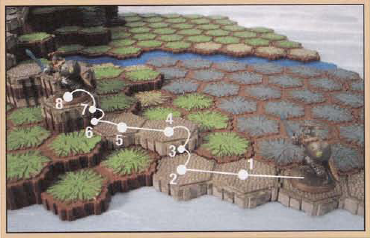
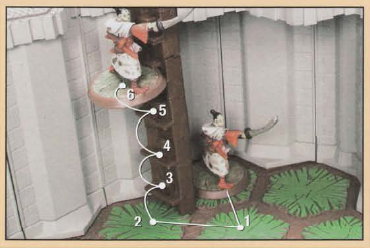
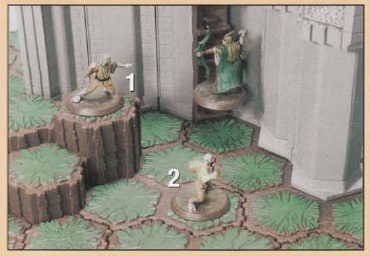
- Overhangs: An overhang exists when one or more tiles are above another tile with space in between. Figures that are small enough to do so may move under overhangs. (Example 12 shows an overhang.)
 EXAMPLE 12: Moving under an overhang
On the Migol’s Tomb battlefield, notice that Finn can move under this overhang but Grimnak cannot.
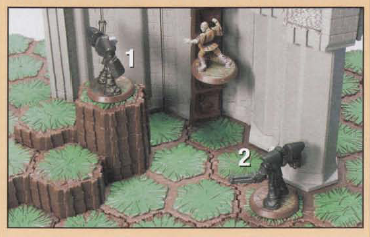
- Figures can also move up onto low overhangs, as long as their Height and Move numbers are enough to do so. When you move a figure up a low overhang, use nearby supporting tiles to help determine the level of the overhang. See Example 13.
 EXAMPLE 13: Moving up onto a low overhang
Use nearby supporting tiles to help with counting levels as Finn moves onto this overhang.
- Keep the base on the space: When you end a figure’s move, make sure its base lies flat and is on that space only (or spaces, in the case of doublespace figures). No part of its base may overlap another space or an area between spaces.
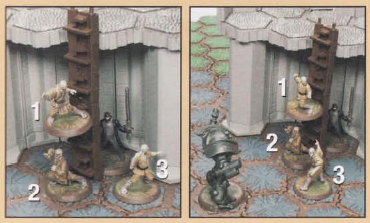
- Tight quarters: Some battlefields have narrow passageways, obstacles, and overhangs that might limit the movement of some figures. A figure can’t move through or onto a space that it can’t fit completely onto. Example 14 shows a figure in tight quarters.
 EXAMPLE 14: Grimnak moves into tight quarters
Grimnak can’t back into this nook, because his tail keeps him from standing completely
on the spaces (top picture). However, he can move forward into the nook (bottom picture).
Remember, you can flip a double-space figure if it has trouble fitting when facing
in one direction. If it cannot fit while facing in either direction, it cannot move
onto those two spaces.
ENGAGEMENT AND ADJACENCY RULES
A figure becomes engaged when it moves adjacent to an opponent’s figure. Friendly
figures that are adjacent to each other, are not engaged with each other. Double-space
figures check for adjacency and engagement from both of their spaces. Adjacency Exceptions: Most of the time, if a figure is next to another figure, they are adjacent. Here
are the exceptions to the rule:
- If one figure’s base is on a level equal to or higher than the height of the other figure, they are not adjacent and therefore not engaged. See Example 15, below.
 EXAMPLE 15: Not adjacent
Finn is not adjacent to Deathwalker because Deathwalker is on a ledge which is 5 levels
high, which is equal to Finn’s height of 5.
- If an obstacle such as a ruin, stone wall, or battlement is between two figures, to be engaged both figures’ heights must be higher than the obstacle. If one or both figures’ heights are lower than the obstacle, they are not engaged. For example, a ruin has a height of 6. If Finn (height of 5) and Deathwalker (height of 7) are next to each other with a ruin between them, they are not engaged.
- You check the adjacency of each space, but not while your figure is "between" each space. For example, if Sgt. Drake is unengaged before using his Grapple Gun, and passes next to an opposing figure on a nearby ledge while on his way up, but is not adjacent to that figure by the time he ends his Grapple movement, he did not just move in and out of engagement (adjacency) with that figure because it happened while he was between the two spaces of his Grapple movement.
Leaving an engagement: Your figure may move around an opponent’s figure that it is engaged with, but as soon as you decide to move your figure away (onto a space that’s not adjacent), you must announce to your opponent you plan to leave the engagement. The opponent’s figure may take a “leaving engagement attack” on your figure. (Your opponent can choose not to do the attack.) To do this, the player who controls the opponent’s figure rolls 1 die to attack. You do not roll any dice to defend your figure. If a skull is rolled, your figure takes 1 wound. Place 1 wound marker on its Army Card (see Life, here.) Note: Your figure is considered to still be on the adjacent space during the attack. If it survives the attack, it may then move out of engagement.
Multiple engagements: Your figure may become engaged with more than one figure at the same time. As you leave each engagement, your opponent’s figure may roll 1 attack die. For each skull rolled, your figure takes 1 wound. Example 16 shows a multiple engagement.
 EXAMPLE 16: Multiple engagement
When you announce that Finn will move away from two opposing Tarn Viking Warriors, your opponent rolls two attack dice
(one for each Viking Warrior). Two skulls are rolled, inflicting two wounds. You place
two Wound Markers on Finn’s Army Card before moving him out of engagement.
Action 3. Attack with Figure(s) shown on the Army Card (Optional)
Now it’s time for you to attack with your Hero or Squad.
Who can attack? Any figure(s) on your chosen Army Card within Range, and with a clear Line of Sight (if necessary; see below) to a target, can attack. If no figure on your Army Card meets these two conditions, then no attack is possible.
Looking for hidden figures: At any time, feel free to walk around the battlefield to find out which figures are hiding where: behind raised terrain areas or a ruin, for example. As you do this, other players might want to shield their order markers so you can’t see them.
Before attacking with a figure, check the Range and Line of Sight as follows:
- Range: A targeted figure must be within the Attacking figure’s Range: for example, with a Range of 6, your Marro Warrior can attack any figure within 6 spaces from it.
- A figure with a Range of 1 can attack a figure only from an adjacent space.
- A double-space figure can attack from either space it occupies.
- When checking the Range, don’t count extra spaces for any difference in levels. If the distance between your figure and the targeted figure includes an area with no spaces (for example, near the edge of the battlefield), you may still attack it, but you must count the spaces along the edge of the battlefield to check the Range.
- Engaged figures: If one of your figures is engaged with one or more opposing figures, your figure may attack only those figures. This includes both normal attacks and special attacks. (Special attacks are explained here.) However, this does not include special powers that use range. Note: A figure does not need Line of Sight to attack a figure that it is engaged with or adjacent to.
- Attacking around other figures: You may attack figures even if other figures are between your figure and the targeted figure, but you must still have a clear Line of Sight to attack.
- Line of Sight: To attack a targeted figure, your figure must be able to “see” it from its location. Unlike Range, the Line of Sight is an imaginary straight line between your attacking figure’s Target Point and the targeted figure’s Hit Zone; it has nothing to do with the spaces on the battlefield. If the targeted figure is (for example) behind a ruin or a cliff, so that your figure can’t “see” it, then no attack is possible. The only exception to this rule is if a figure is engaged with or adjacent to another figure. A figure does not need Line of Sight to attack a figure that it is engaged with or adjacent to.
- Facing does not matter when determining Line of Sight for the single spaced figures. Assuming the Target Point is on the figure's head, the best way to tell if your Attacker has a clear Line of Sight is to get behind its head and look at the targeted figure. If you can see any part of the targeted figure's Hit Zone from its head, you have a clear Line of Sight. The facing of the attacker's head does not matter. With double-space figures, facing does matter, as certain areas of the body may block Line of Sight. Remember that you can flip your figure anytime during a double-space figure's move, so keep Line of Sight in mind when you are moving.
- If players disagree about whether or not there is a clear Line of Sight, have an independent person make the call. If this is not possible, then roll the 20-sided die; the high roller wins the dispute.
- When targeting a double-space figure, if one half is within range and the other half is not, and you can only see the half that is not in range, you may still attack the figure.
Adjusting figures: Players may touch or move only their figures, and may do so only on their turns. For example, a player cannot move his figure out of the Line of Sight on an opponent’s turn. Players may adjust any figure they control during a turn (even after attacking), not just the figures they are using on that turn.
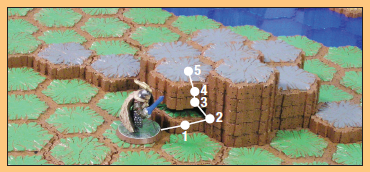
Example 17 shows how to determine if a targeted figure is within an Attacker’s Range and Line of Sight.
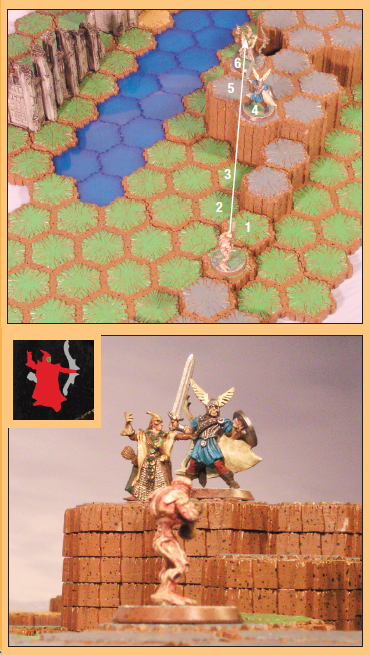 EXAMPLE 17: Range and Line of Sight
You want a Marro Warrior to attack Syvarris.
1. First, you count the spaces between them: there are 6, so Syvarris is within Range.
2. Then, you check for a clear Line of Sight from your figure’s Target Point to Syvarris’
Hit Zone. The Tarn Viking is in the way but your figure can still see part of Syvarris’
Hit Zone, so it can attack.
ATTACKING
The figures on your chosen Army Card attack one at a time, in any order. Each figure
can attack only once, but each figure can attack the same figure or a different figure.
Unless stated differently on the Army Card, figures cannot target or attack themselves.
Note: Some figures have special powers that allow them to attack more than once.
Before attacking, consider height advantage, special powers, and Glyphs (if any), as explained below. (The you-snooze-you-lose rule: If you forget to do this, tough luck. Maybe next time, you’ll remember!)
- Height advantage: If the base of one figure is higher than the base of the other figure (no matter what their actual size or height), the higher figure has height advantage and rolls 1 extra die for either attack or defense. If the base of the higher figure is 10 or more levels higher than the height of the lower figure, the higher figure instead rolls 2 extra dice for either attack or defense.
- When figuring height advantage, remember that Glyphs and water tiles do not add height to the spaces they’re on.
- Special powers: Many figures have special powers or abilities that help them move, attack, defend, and more. Check your figure’s Army Card to see what special powers or abilities (if any) your figure can use. Special powers are explained here.
- Glyphs: Some Glyphs give the Attacker or the Defender an advantage. Glyph powers are explained here.
To carry out the attack, follow these steps:
- Announce which figure is the Attacker and which figure is the Defender.
- Check the Attack number on your Attacker’s Army Card, adding any extra dice for height advantage, special powers, or Glyphs. Then roll that number of attack dice. After you roll, the Defender rolls the number of defense dice on his Defender’s Army Card, adding any extra dice for height advantage, special powers, or Glyphs. Note: Once you've determined the number of attack or defense dice you should roll, you must roll that many dice. You cannot choose to roll less.
- Every skull the Attacker rolls counts as one hit. For every skull (hit) the Attacker rolls, the Defender must roll at least one shield to block it. Important: For attack rolls, the Attacker counts only skulls. For defense rolls, the Defender counts only shields.
- If the Defender rolls an equal number or more shields than the Attacker rolled skulls, the attack is unsuccessful. The Attacking and Defending figures stay where they are, and that attack is over.
- If the Attacker rolls more skulls (hits) than the Defender rolls shields, the attack is successful. For each unblocked skull (hit) the Attacker rolled, 1 wound marker must be placed on the Defender’s Army Card.
Life: When a figure has as many wound markers as the Life number on its Army Card, it is destroyed. (A figure with only 1 Life is destroyed by only 1 wound.) The player who controls the destroyed figure places it on the Army Card. When all figures on an Army Card have been destroyed, the Army Card is out of play. Do not reveal any unrevealed order markers that are on that card for that round of play. On future rounds, you can’t take any turns for that card. At the beginning of the next round, any order markers still on that Army Card come back into play and can be placed in future rounds.
Destroying a Common figure when your Army includes two or more of the same Army Card: If your Army includes two or more of the same Common Army Card, follow this rule when a Common figure is destroyed: When any figure on your Common Army Card is destroyed, you may place it on any matching Army Card, if you do not have any of these figures destroyed. If a Common Army Card already has a destroyed figure on it, you must fill up that card first before placing the destroyed figure on an empty card.
After you’ve finished attacking, your turn is over. The player to your left then takes a turn. Example 18 shows an attack and its outcome.
 EXAMPLE 18: An Attack
One of your Marro Warriors attacks Syvarris. You roll 2 attack dice.
Syvarris has a height advantage, so he adds 1 die to his Defense number. Your opponent
rolls 3 defense dice.
You roll 2 skulls; Syvarris rolls no shields.
Syvarris takes 2 wounds. Place 2 Wound Markers on Syvarris’ Army Card.
Syvarris had 2 wound markers from a previous attack. He now has 4 Wound Markers, and
is destroyed. Your opponent places Syvarris on the Army Card, and leaves the Order
Marker there (he must skip his turn for Syvarris on this round).
ENDING A ROUND
After the last player takes his third turn, the round is over. Move the round marker
ahead one space on the track (if no one has won yet). Players then begin a new round
by placing their order markers, then rolling for initiative.
ENDING THE BATTLE
The game scenario sets the victory conditions for each game. However, if the game
hasn’t ended by the time you’ve played a certain number of rounds, you may decide
that the player (or team) with the most points wins. See Scoring, below.
Winning: Victory conditions are checked at the end of each turn, after all end-of-turn abilities are completed (unless otherwise stated in the scenario). This is important, as there are many powers where figures can change hands temporarily.
SCORING
In cases where scoring is necessary, each player scores points for each Army Card
with figures still on the battlefield. Score the full points listed on the Army Card,
even if there is only one surviving Squad figure.
Glyphs
Depending on the scenario, Glyphs are placed on top of battlefield spaces either power-side up or symbol-side up. Glyphs are stationary unless otherwise stated in a scenario. When one of your figures moves onto a Glyph that is symbol-side up, stop there and turn the Glyph power-side up; the powers on the Glyph take effect immediately. When your figure lands on a power-side up Glyph, it must stop. Note: A double-space figure must stop when its leading half moves onto a Glyph.
Permanent Glyphs
The power of each permanent Glyph is in effect for as long as a figure is standing
on it. Exception: The Glyph of Brandar is an artifact, which represent an object as directed by the
specific Game Scenario.
Temporary Glyphs
The power of each temporary Glyph takes effect only once. When one of your figures
moves onto any of these Glyphs, follow its rules, then remove it from the game.
See the Glyphs table for a complete list of Glyphs and Treasure Glyphs. (Treasure Glyphs are explained here.)
Special Powers
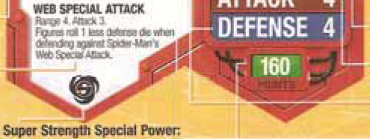
The special powers of the figures keep each game exciting, challenging, and unpredictable. Always be aware of the special powers your figures possess; they can make a big difference in your game.
Special Attacks: If your Army Card includes a special power with the words “Special Attack” in the name, you may use this attack instead of a normal attack. Special attacks can never be modified by Glyphs, height advantage, or other special powers.
Attack dice and defense dice: Any time an Army Card refers to attack dice or defense dice, use combat dice. For example: Raelin’s card states that all figures you control within 4 clear sight spaces of Raelin add 2 to their defense dice. These defending figures would roll 2 additional combat die when rolling for defense.
Clear Sight Spaces: Raelin's Defensive Aura mentions "clear sight". To determine clear sight, use Raelin's head (because her Target Point is on her head). If she can see any part of your figures (not just the Hit Zone) within the 4 spaces, they are affected by the Defensive Aura. To determine clear sight from a double-space figure, you may count spaces from either space the figure occupies. For single-space figures, just like with Line of Sight, facing doesn't matter. (See Line of Sight, here.)
Multiple Targets: When a special attack targets more than one figure at the same time, the Attacker decides the order in which the Defender will roll combat dice for each figure affected.
Flying and Overhangs: See Example 19. Note: Flying figures may choose to walk (normal movement), or fly, and even switch between flying and walking during mid-movement.
 EXAMPLE 19: Flying and Overhangs
Raelin flies out of the overhang and onto the top, ignoring extra spaces for elevation.
M1 will roll a leaving engagement die since she was engaged before starting her move;
M3 will not, because she flies over him without landing. Notice that she also flies
over the ruins.
Special Power References on Army Cards: Some special powers make reference to the Species, Personality, Valkyrie, Unique/Common/Uncommon, Hero/Squad, and/or Class of other figures. For example, Deathwalker makes reference to Soulborg Guards; the Zettian Guards fall into this category.
Simultaneous Special Powers: If you and an opponent are using the same Army Cards with special powers that happen at the same time, you must roll the 20-sided die to see who gets to use them first.
Team Play
Team seating and play: If you’re playing a team game, teammates should sit next to each other on one side of the table, facing their opponent(s). Unless stated otherwise in the game scenario, teammates start in the same starting zone.
Teammates play the game separately, but they can discuss strategy, offer suggestions, and so on. Teammates can look at each other’s order markers. Victory conditions for teams vary with the game scenario, but in most games they work together toward a common goal.
Team scoring: In cases where scoring is necessary, each team scores points for each Army Card with figures still on the battlefield. Score the full points listed on the Army Card.
Using Multiple Game Sets
Combining two or more Master Sets, or collecting expansion sets, gives you lots of new options. You can create a super-sized battlefield and play with any number of players. You can even boost the point value of your Armies, to match the bigger battlefield. But along with that extra excitement come a few special rules.
Unique Army Cards: If you’re combining two sets of Army Cards, make sure that no player has more than one of the same Unique Army Card in their Army. (For example, your Army can’t include two Raelin figures.) However, you and an opponent can both have the same Unique Army Card(s). For example, you and your opponent can each have one Raelin in your Armies.
Unique Heroes with the same name: The "Rise of the Valkyrie" Master Set and the "Swarm of the Marro" Master Set each has a Raelin and a Sgt. Drake Alexander. A player cannot have two Unique Heroes with the same name. For example, a player cannot have a Swarm of the Marro Raelin and a Rise of the Valkyrie Raelin in the same Army.
Uncommon Army Cards: Your Army can include two or more of the same Uncommon Army Card. If so, follow these special rules:
- Unlike Common Army Cards, you must keep track of which figures belong to which Uncommon Army Card. You can use colored stickers to track which Uncommon figure belongs to which Uncommon Army Card.
- Besides that one difference, Uncommon Army Cards are treated exactly the same as Unique Army Cards for all other rules and special powers on all Army Cards and Glyphs.
Marking Your Figures: If you are playing with multiple sets or expansion sets, you may want to use a permanent marker to initial the underside of your figures’ bases to remember who owns which figure.
Rise of the Valkyrie
Long and Short Ruins
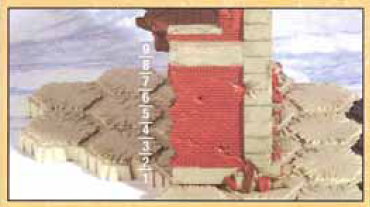
Moving over the Ruins: The Long and Short Ruins are both 6 levels high. In order to climb over a Ruin using normal movement, a figure would need a move number of at least 7 to get onto the other side, and the figure's height would have to be higher than 6 in order to move over it.
Special Powers
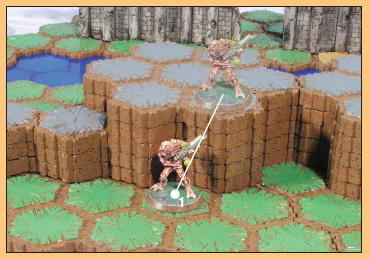
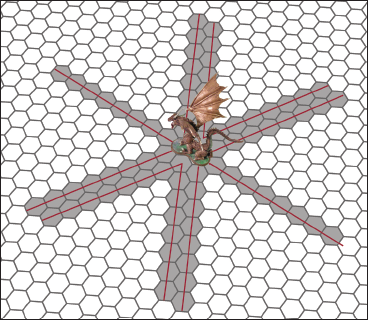 EXAMPLE 20: Mimring’s Fire Line Special Attack
From either his front space or back space, Mimring’s Fire Line Special Attack can
affect figures within 8 spaces in any direction (see the red lines). The affected
figures can be on any level, as long as Mimring has a clear Line of Sight.
 EXAMPLE 21: Fire Line Special Attack into an Overhang
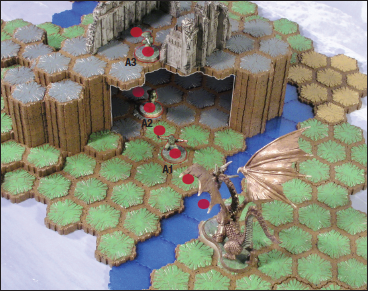
If Mimring uses his Fire Line Special Attack into an overhang, it affects the figures
on all levels in the line of attack, as long as he can see them. As shown here, Airborne
Elite figures A1, A2 and A3 are all affected by Mimring’s attack. They will all roll
defense dice separately after Mimring rolls 4 attack dice once.
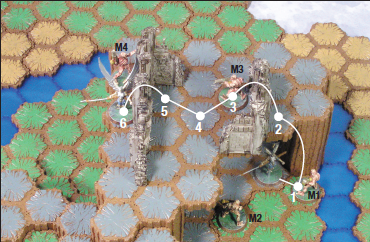
 EXAMPLE 22: The Airborne Elite Lob Grenades
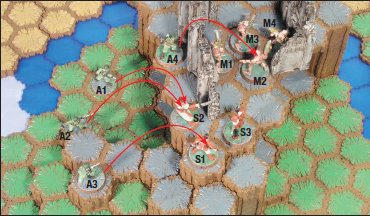
You decide to lob grenades at the Marro Warriors and the Samurai. Remove the Grenade
Marker from the game. You target all figures within a Range of 5 and a Lob height
of 12 levels or less. For example, the A1 Airborne Elite can’t attack the M2 Marro
Warrior, because the overhang is 10 levels high, and the ruin on top has a height
of 6, for a total of 16. To lob a Grenade, a clear Line of Sight is not needed: only
a clear area to lob the Grenade.
Here’s how the special attack is carried out:
- A1 attacks: A1 lobs a grenade at S2. S1 and S3 are also affected, since they’re adjacent to S2.
- You roll 2 attack dice once for all 3 affected figures. You get 1 skull.
- Your opponent rolls 6 defense dice for S2 (5 dice for its Defense number and 1 die for height advantage.). He gets 2 shields, so S2 is safe. He then rolls 3 shields for S1, so S1 is safe; and 0 shields for S3, so S3 is destroyed.
- A2 attacks: Next, A2 lobs a grenade at S2. S1 is also affected.
- You roll 2 attack dice and get no skulls. Your opponent does not need to roll for either S2 or S1, because no skulls were rolled.
- A3 attacks: Next, A3 lobs a grenade at S1. S2 is also affected. You roll 2 attack dice, and get 2 skulls.
- Your opponent rolls 1 shield for S1, so S1 is destroyed. He then rolls 2 shields for S2, so S2 is safe.
- A4 attacks: A4 lobs a grenade at M2. M1, M3 and M4 are also affected.
- You roll 2 attack dice, and get 1 skull.
- Your opponent rolls 3 defense dice for M2, and gets 1 shield, so M2 is safe. He rolls 2 shields for M1, then 3 shields for M3, so M1 and M3 are safe. He then rolls no shields for M4, so M4 is destroyed.
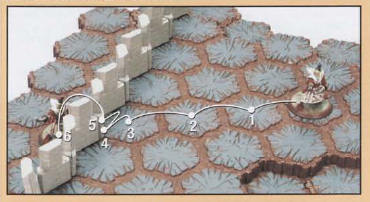
Road to the Forgotten Forest
Roads
Moving on Road Spaces: When moving your figures on road spaces, count each space as a normal space. However, if your figure's entire move consists of road spaces, including the starting space (or both starting spaces for double-space figures), you may add an additional 3 spaces to your figure's move. The additional spaces must also be on road spaces. See Example 23.
 EXAMPLE 23: Moving on Road Spaces
Finn's move is 5. Finn's entire move is on road spaces, so he can move 8 total spaces.
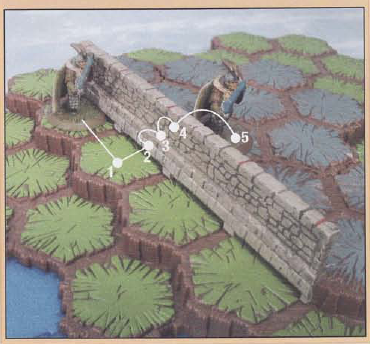
Stone Walls
Moving over Stone Walls:
Figures may move over stone walls. When moving over a stone wall, count the height
of the stone wall as spaces. The height of the inside wall (the side connected to
the tile) is 2. The height of the outside wall (the side not connect to a tile) is
3. See Examples 24, 25 and 26.
 EXAMPLE 24: Moving over an inside wall
Finn has a move of 5. The inside wall costs 2 movement spaces to move over because
it has a height of 2.
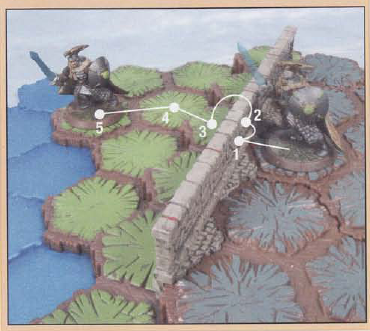
 EXAMPLE 25: Moving over an outside wall
The outside wall costs 3 movement spaces to move over because it has a height of 3.
 EXAMPLE 26: Moving over an outside wall
When a figure moves over an elevated outside wall, be sure to count the height of
the wall and nearby support tiles.
A figure cannot move over a stone wall if it cannot move enough spaces to get to an empty space on the other side.
Falling:
To determine if a figure is considered falling after moving over a stone wall, measure
its fall from the top of the stone wall.
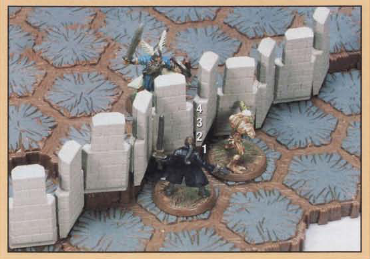
Engagement:
When a stone wall is between two figures, both figure's heights must be higher than
the stone wall as positioned on the battlefield to be engaged. If one or both of the
figures are equal to, or are below the wall, they are not engaged. The stone wall
has a height of 2 on the inside and a height of 3 on the outside. See example 27.
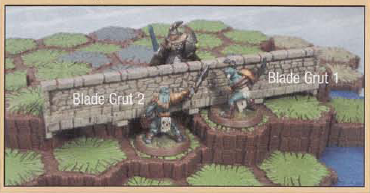 EXAMPLE 27: Stone Wall Engagement
Blade Grut 1 is engaged with Finn. Blade Grut 2 is not engaged with Finn because Blade
Grut 2 has a height of 4 and the stone wall, as positioned on the battlefield, has
a total height height of 4.
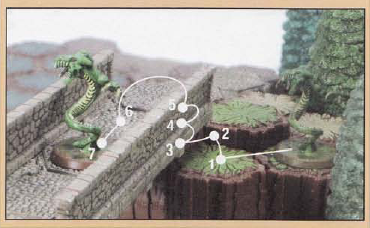
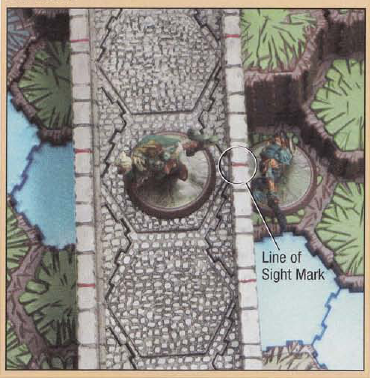
Line of Sight Marks:
Line of Sight Marks are the red markings on the tops of the stone walls used only
for range attacks. They are used for Line of Sight only when attacking from the inside
of the stone wall. A figure next to a Line of Sight Mark may use this mark instead
of his or her Target Point. It is the equivalent of leaning over the wall to target
an opponent. To use a Line of Sight Mark, choose a Line of Sight Mark that is next
to the space your figure is on. Then target your opponent by lining up the Line of
Sight Mark at the outside edge of the wall to your target. If there is a clear line
of sight, you may use a range attack. See Example 28.
 EXAMPLE 28: Using a Line of Sight Mark
Syvarris using his Target Point cannot see the Blade Grut. However, when Syvarris
uses the Line of Sight Mark on the Stone Wall, he can see the Blade Grut and therefore
can attack.
Figuers with special powers that reference clear sight spaces, like Raelin, may also use the Line of Sight Mark in addition to their Target Point, to determine who their special power affects.
Evergreen Trees (or Snowy Evergreen Trees)
Moving Around Evergreen Trees:
Figures are not allowed to move through any spaces that are occupied by trees. Figures
cannot move through any of the 4 spaces occupied by evergreen tree 15.
Line of Sight:
All evergreen trees block Line of Sight. Long range attacks can only be used when
a clear Line of Sight is available between evergreen trees. See Example 29 and 30.
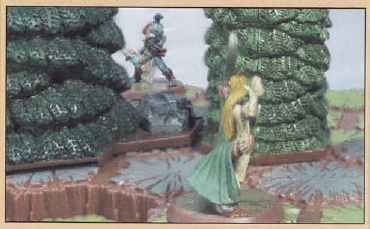 EXAMPLE 29: Looking between the trees
Syvarris can easily see the Blade Grut between the trees.
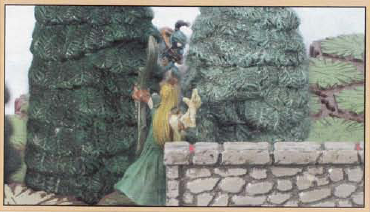 EXAMPLE 30: Looking between the trees
There is a small area but Syvarris can see the Blade Grut between the trees.
Volcarren Wasteland (Lava Fields)
Molten Lava
When it comes to height and normal movement, treat molten lava spaces like water spaces except for the following:
Glyphs: You cannot place Glyphs or Treasure Glyphs on molten lava spaces.
When a figure moves onto a molten lava space, you must roll for molten lava damage.
Double-spaced figures: When the leading half of a double-space figure moves onto a molten lava space, you must roll for molten lava damage.
Rolling for molten lava damage: Roll the 20-sided die. If you roll a 20, your figure has miraculously survived. If you roll a 1-19, your figure is destroyed.
Flying: Figures with the special power Flying (or any similar power that ignores elevation, like Stealth Leap) may fly over molten lava without rolling for molten lava damage.
Lava Fields
There are no special rules for moving onto or through lava field spaces. However, at the end of the round, all figures still on lava field spaces must roll to see if they take lava field damage.
Double-spaced figures with one space on a lava field tile must still roll for lava field damage. Double-spaced figures that occupy two lava field spaces roll only once for lava field damage.
Rolling for lava field damage: In turn order, all players must roll for all their figures on lava field spaces. To do this, roll one attack die. If you roll a skull, that figure takes a wound. Otherwise it is safe. Players may choose in what order to roll for their own figures.
Thaelenk Tundra (Snow Fields)
Ice
Figures may move on Ice Tiles by counting each hex according to the type of ice specified in the scenario. Ice Tiles do not add height when counting levels. Do not count for height when moving up or falling down.
There are 2 different types of Ice Tiles that may be specified for any scenario. Both are explained below.
Normal Ice: Move on Normal Ice counting each hex as 1 space.
Slippery Ice: Move on Slippery Ice counting each hex as 2 space. Figures may fly or leap over Slippery Ice, counting each hex as 1 space.
Double-space figures may move on Slippery Ice using the leading half of the base to count spaces.
Landing on Slippery Ice: A single-space figure that lands on Slippery Ice (from flying, leaping, falling, etc.) must count the landing as 2 spaces. Double-space also only count the landing as 2 spaces, whether the landing is on one Slipper Ice space or two.
Falling onto an Ice Tile: Unlike Water Tiles, figures that fall onto an Ice Tile may receive wounds. See Falling here.
Snow
Figures may move on Snow Tiles by counting each hex according to the type of snow specified in the scenario. Normal rules for counting levels (the sides of the tiles) applies to both types of Snow Tiles.
There are 2 different types of Snow Tiles that may be specified for any scenario. Both are explained below.
Light Snow: There are no special rules moving onto or through Light Snow Tiles.
Heavy Snow: Move on Heavy Snow counting each hex as 2 space. Figures may fly or leap over Heavy Snow, counting each hex as 1 space.
Double-space figures may move on Heavy Snow using the leading half of the base to count spaces.
Landing on Heavy Snow: A single-space figure that lands on Heavy Snow (from flying, leaping, falling, etc.) must count the landing as 2 spaces. Double-space also only count the landing as 2 spaces, whether the landing is on one Heavy Snow space or two.
Glacier Mountains
Glacier Mountains are towers of ice that block normal movement and line of sight. Figures may not land on or move through Glacier Mountains. If Glacier Bases are used as Ice Tiles, follow the above rules for both types of Ice Tiles.
Fortress of the Archkyrie
Fortress Walls
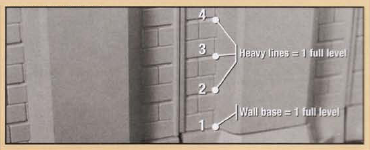 EXAMPLE 31: Counting Levels on Fortress Walls
The Fortress Walls are marked with heavy lines to help count levels. Each heavy line
equals 1 full level.
Wall Walks
Using Wall Walk Tiles as Road Tiles: When Wall Walks are not supported by Fortress Walls, you can link and stack them the same way you link and stack other terrain tiles such as grass, sand, and rock tiles. The Wall Walks then become Road Tiles in your battlefield.
Moving on Wall Walk Tiles or Road Tiles: Wall Walk Tiles or Road Tiles create spaces that may allow your figures to travel more quickly than normal. Figures may move on and occupy all Wall Walk or Road spaces similar to other normal terrain spaces such as rock, grass, or sand. When moving your figures on Wall Walk or Road spaces, count each space as a normal space. However, if your figure's entire move, including the starting space (or both starting spaces for double-space figures), consists of Wall Walk spaces, Road spaces, or a combination of both, your figure receives a bonus and you may add 3 spaces to your figure's move. The 3 additional spaces must also be on Wall Walk and/or Road spaces. Figures cannot use ladders with the bonus. Example 32 shows a figure walking on a Wall Walk.
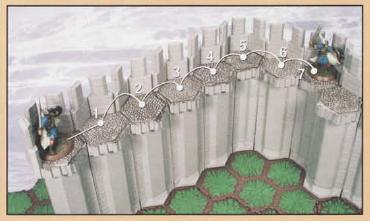 EXAMPLE 32: Moving on Wall Walk Spaces
The Tarn Viking Warrior's Movement is 4. His entire move is on Wall Walk Spaces, so
he can move 7 (4+3) total spaces.
When a figure moves from one Wall Walk to a higher level, the figure must add the difference in height to the movement, similar to the "Moving Up" rule here. When moving down to a lower Wall Walk space, you do not need to count the difference in levels unless the level is equal to or more than the height of the figure. See Falling rules here.
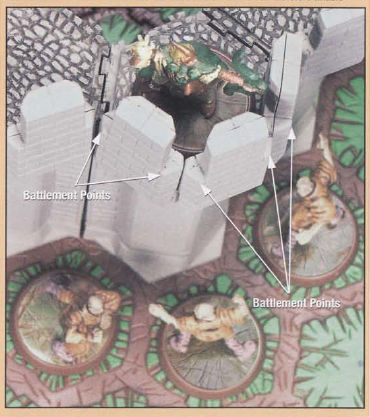
Battlements
Battlements are structures that may be added to Wall Walks or hex-shaped tiles such as grass, rock or sand. Battlements offer valuable protection during battles by providing figures obstacles to hide behind.
Moving over Battlements: Figures may move over Battlements. Count the lowest part of a Battlement as spaces in addition to any difference in levels that may need to be counted during the figure's movement. The height from the inside of a Battlement (the side connected to a tile) is 2. The height from the outside of a Battlement (the side not connected to a tile) is 3. See Examples 33 and 34.
 EXAMPLE 33: Moving over a Battlement from inside
The Izumi Samurai has a move of 6. The inside wall costs 2 movement spaces to move
over because it has a height of 2.
 EXAMPLE 34: Moving over a Battlement from outside
The Izumi Samurai has a move of 6. The outside wall costs 3 movement spaces to move
over because it has a height of 3.
Engagement Rules: Figures adhere to the same Engagement Rules as described here. If two figures are on adjacent spaces separated by a Battlement, both figures' heights must be higher that the lowest part of the Battlement to be adjacent or engaged. See Example 35.
 EXAMPLE 35: Battlement engagement
The outside part of the Battlement has a height of 3, plus the extra level below it
for a total height of 4 (3+1). Agent Carr has a height of 5, so he is adjacent to
and engaged with the Tarn Viking Warrior. The Marro Warrior has a height of 4, so
he is not adjacent to or engaged with the Tarn Viking Warrior.
Line of Sight: Battlement Points may be used as Target Points. Battlement Points, on the corners of the Battlement, are used only for range attacks. They are used for Line of Sight only when attacking from the inside of the Battlement. A figure next to a Battlement Point may use this point instead of his or her Target Point. It is the equivalent of leaning over the Battlement to target an opponent.
To use the Battlement Point, choose a Battlement Point that is next to the space your figure is on. Then target your opponent by lining up the Battlement Point at the outside edge of the Battlement to your target. If there is a clear Line of Sight, you may use a range attack. See Example 36. Figures with special powers that reference clear sight spaces, like Raelin, may also use Battlement Points in addition to their Target Point, to determine whom their special powers affect.
 EXAMPLE 36: Battlement Points
Using his Target Point, Syvarris cannot see the Shaolin Monks. When Syvarris uses
the Battlement Points, he can see the Monks, and can therefore attack.
The Doorway
The Doorway allows figures to enter and exit a Fortress. Attached to the Doorway is a moveable Door that may be opened and closed. Figures cannot see or target other figures through the Doorway when the Door is closed. Only figures are allowed to occupy the 4 Doorway spaces. See Example 37.
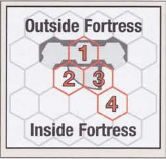 EXAMPLE 37: The 4 Doorway Spaces
The Fortress Door: The Door is a destructible object that may be opened and closed. Unless specified differently at the beginning of a scenario, the Door starts every game in the closed position. The scenario will also specify who has control of the Door and the Door Card.
Control of the Door: Control of the Door is managed by the player who controls the Door Card. This player rolls defense dice when the Door is attacked. The controlling player loses control of the Door when a new player occupies Door Space #4. The Door Card, along with any wound markers, is immediately taken over by the new controlling player.
Rules for Opening or Closing the Door:
- As long as the controlling player's figure occupies Doorway Space #4, the controlling player may open or close the Door. If the figure moves from this space or is destroyed, and the space remains unoccupied, the Door cannot be opened or closed.
- When the door is closed, it must be completely closed to occupy the space in the Doorway (Space #1). When closed, it is considered barred from the inside and may not be opened from the outside by any enemy figures.
- When the Door is open, it must be opened completely to occupy Space #3 as shown in Example 38. Only those figures that can fit on and move through Space #1 are allowed to pass through the Doorway.
- The Door may be opened or closed by the controlling player for his/her own figures and for other figures that may want to pass through. The controlling player may only open or close the Door during his/her turn or a teammate's turn, but not during an opponent's turn. See Example 38.
- When opening or closing the Door, all spaces #1, #2, and #3 must be unoccupied. If there is a figure on one of these spaces, the Door may not be opened or closed.
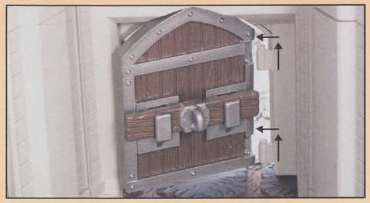
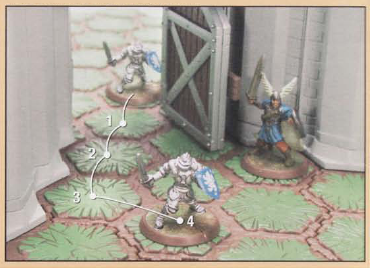 EXAMPLE 38: Opening the Door
A Tarn Viking is on Doorway Space #4 and therefore has control of the Fortress Door.
He has opened it to allow the Knight to enter.
Targeting the Door: Instead of choosing a figure to attack, players may target the Door as a Destructible Object. Destructible Objects may be targeted and attacked much the same way a figure is targeted and attacked. The Door's defense against attacks is described below. To target the Door, use the hex-shaped tile space below the Door to determine adjaceny, or range, as shown in Example 39.
 EXAMPLE 39: Targeting the Door
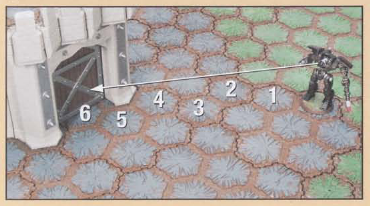
Deathwalker 8000 (Range of 7) has Line of Sight to the Fortress Door and may attack
with a range attack using the space below the Fortress Door to determine range.
Attacking and Defending: The Door may be attacked by a normal attack, a special attack, or by special powers that only cause wounds. Add Height Advantage where appropriate. The Door may receive wounds the same way that a figure may receive wounds. See Example 40. Note: If the door is closed and attacked by a special attack that affects adjacent figures, that includes figures adjacent to both sides of the Door.
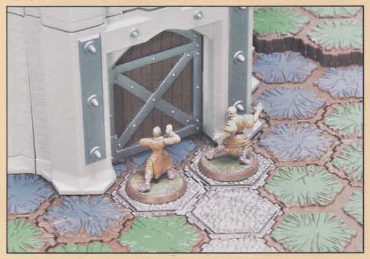 EXAMPLE 40: Attacking and Defending the Door
The two Shaolin Monks are adjacent to Doorway Space #1, the space the Door currently
occupies, so they may attack the Door. Each figure attacks separately. The Door is
allowed 4 Defense Dice and any "Reinforced Defense" as specified on the Door Card.
Any skulls not blocked by shields count as wounds. Place the appropriate amount of
wound markers on the Door Card.
The Door cannot be engaged: When an opponent is controlling the Door, if one or more of your figures is adjacent to it, your figure(s) is not engaged with the Door. Engagement rules do not apply to Destructible Objects that can be controlled by players.
Special Power restrictions: Unless specified differently by a special power or scenario, use the following restrictions when trying to decide if the Door (or other Destructible Object) is affected by a special power.
- The Door does does not have a size. Special Powers or Special Attacks that target or enhance the attacking figure if the defending "figure" is a certain size will not work. Examples: Deadeye Dan's Ullar Enhanced Rifle Special Attack, Jotun's Throw, Sir Denrick's Giant Killer, and Gladiatron's Cyberclaw.
- The Door cannot be destroyed outright. Special Powers or Special Attacks that even mention "destroy" as one of the effects cannot be used against the Door. Examples: Deadeye Dan's Sharpshooter, and Grimnak's Chomp.
- The Door is not a figure. Special Powers that are not necessarily an attack cannot affect the Door. Examples: Morsbane's Rod of Negation, Ne-Gok-Sa's Mind Shackle, Agent Carr's Ghost Walk, and Raelin's Defensive Aura.
Destroying the Door: The Door has 10 life; if the Door receives 10 Wounds, the Door is destroyed. Remove the destroyed Door as shown in Example 41.
 EXAMPLE 41: Removing the destroyed Door
Remove the Door by gently pulling it up and off its hinges, then place it out of the
game.
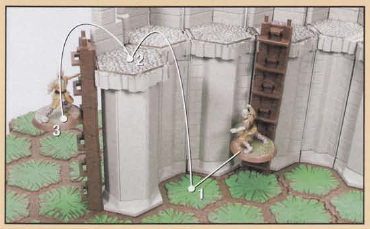
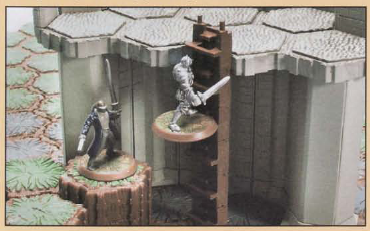
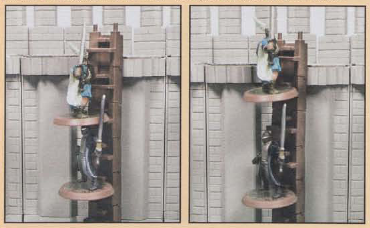
Ladders
A ladder may consist of 1 or more Single-Rung Ladder Pieces. Ladders may be used only by small or medium single-space figures, to allow them to move onto spaces on walls and terrain. If a ladder is unoccupied, larger figures can bypass the ladder using normal movement rules, counting the levels behind the ladder. Small or medium figures cannot bypass Ladders while moving up the side of the terrain where it has been placed.
Movement on Ladders: Figures may move onto a Ladder by moving onto a Rung Space, counting the move to this rung as if it were a hex-shaped tile space. To end a figure's move on a Ladder, slide its base into a rung.
Treat each figure on a rung as if it were on a hex-shaped tile space. All rules for normal movement on hex-shaped tile spaces apply to figures on Ladders except the following:
- When moving up or down, each rung counts as 1 space; do not count levels.
- Figures are not allowed to skip rungs unless they fall off a Ladder.
- Figures are not allowed to fall from any space onto a Ladder rung.
Figures must count levels (not rungs) when falling off a Ladder to determine falling damage.
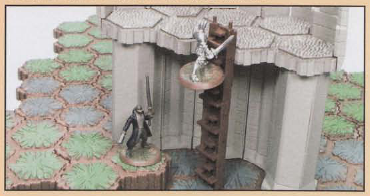
Only one ladder may be built on a hex-shaped tile space such as grass, rock, sand, etc. This space is called the Landing Space. Move on and off Ladders as shown in Examples 42-48.
 EXAMPLE 42: Using the Landing Space
Moving onto a Ladder from a Landing Space (left image). Moving off of a Ladder onto
a Landing Space (right image).
 EXAMPLE 43: Counting the Landing Space
Moving onto a Ladder and counting the Landing Space (left image). Moving off of a
Ladder and counting the Landing Space (right image).
 EXAMPLE 44: Moving onto a Ladder from a hex tile space
Moving onto a Ladder Rung from a same-level hex tile space (left image). Moving onto
a Ladder Rung from a different-level hex tile space (right image).
 EXAMPLE 45: Moving off of a Ladder and onto a hex tile space
Moving off of a Ladder onto a same-level hex tile space (left image). Moving off of
a Ladder onto a different-level hex tile space (right image).
 EXAMPLE 46: Moving from one Ladder to another Ladder
Moving from one Ladder to a same-level Ladder (left image). Moving from one Ladder
to a different-level Ladder (right image).
 EXAMPLE 47: Moving from one Ladder to another Ladder
Moving from one Ladder to a same-level Ladder (left image). Moving from one Ladder
to a different-level Ladder (right image).
 EXAMPLE 48: Moving around Ladders
This Izumi Samurai must move around the Ladder to use it or to occupy the Landing
Space. Figures may not move through Ladders.
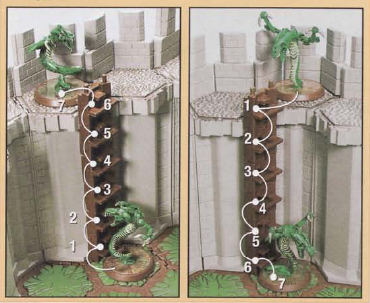
Special Movement on Ladders: Figures that fly, leap, jump, or have similar movement over spaces may move from Rung to Rung, Ladder to Ladder, or on and off of a Ladder, counting only the spaces on the battlefield as they would during their normal movement. See Examples 49 and 50.
 EXAMPLE 49: Flying onto a Ladder
Raelin flies 6 spaces from one Ladder to another Ladder.
 EXAMPLE 50: Leaping onto a Ladder
The Shaolin Monk uses his Stealth Leap of 3 to move from one Ladder to another Ladder.
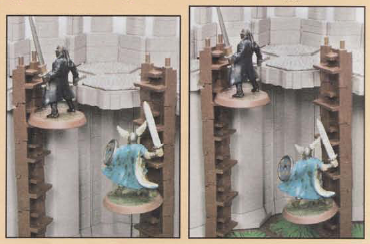
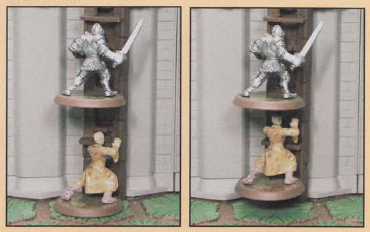
Engagement: Treat each figure on a Rung as if it were on a hex-shaped tile space. All rules for being adjacent or engaged on hex-shaped tile spaces apply to figures on Ladders. See Examples 51, 52 and 53.
 EXAMPLE 51: Figures engaged
The Knight is adjacent and engaged with Agent Carr.
 EXAMPLE 52: Figures not engaged
The Knight is not adjacent to, and therefore not engaged with Agent Carr because the
Knight is equal to or higher than the height of Agent Carr.
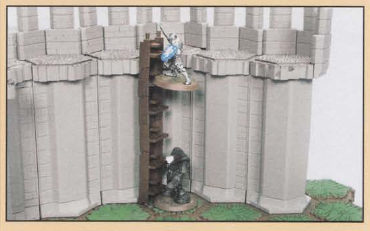
 EXAMPLE 53: Engagement between figures on different Ladders
The Tarn Viking is 4 levels below Agent Carr on the Ladder. Because the Tarn Viking
has a height of 5, they are adjacent and engaged. (left picture). The Tarn Viking
is 6 levels below Agent Carr on the Ladder, and therefore they are not adjacent or
engaged. (right picture).
If two figures are on the same Ladder, the two figures are engaged if neither figure can move closer on the Ladder to the other. See Example 54.
 EXAMPLE 54: Engagement on the same Ladder
Agent Carr and the Tarn Viking are adjacent and engaged on this Ladder (left picture).
Agent Carr and the Tarn Viking are not adjacent or engaged on this Ladder (right picture).
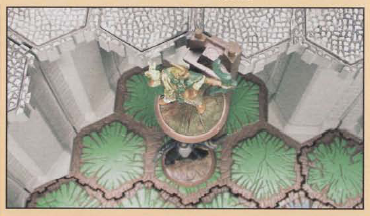
If a figure on a Landing Space can move onto the first Rung and the figure above cannot move closer to the figure on the Landing Space, both figures are adjacent and engaged. See Example 55.
 EXAMPLE 55: Landing Space and Ladder engagement
The Shaolin Monk is adjacent to and engaged with this Knight because the Knight cannot
move any closer to the Monk on the Landing Space (left picture). The Shaolin Monk
is also adjacent to and engaged with this Knight of Weston as shown (right picture).
Hit Zones: The bases of all figures on Ladders are considered valid Hit Zones by all other figures. See Example 56.
 EXAMPLE 56: Using a figure's base as a Hit Zone
The Knight of Weston is on the Ladder; therefore, the Zettian Guard can target the
knight's base as a valid Hit Zone.
Target Points: Figures on Ladders may use the entire edge of their base as an alternate Target Point instead of their normal Target Point when using Line of Sight. See Example 57.
 EXAMPLE 57: Using the edge of a figure's base as a Target Point
Syvarris can target Agent Carr using the edge of his base.
Other Ladder Rules
The Ladder will affect engagement rules as follows:
- Ladders may block Line of Sight when targeting a figure.
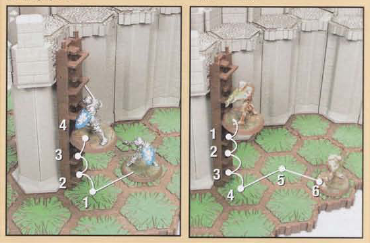
- If 2 figures are completely separated by a Ladder, they are considered neither adjacent nor engaged. See Example 58.
 EXAMPLE 58: Figures separated by a Ladder
Agent Carr is only adjacent to and engaged with Shaolin Monk 3 because the Ladder
separates Agent Carr from Shaolin Monks 1 and 2 (left picture). Explosion Special
Attack by Deathwalker 9000 on Shaolin Monk 2 does not affect Agent Carr because he
is not adjacent (right picture).
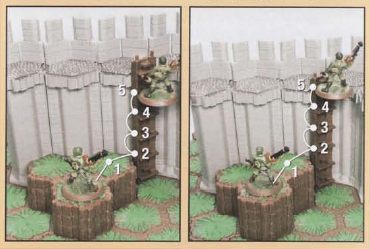
Height Advantage: Figures on a Ladder may receive Height Advantage for attack and defense as explained in the Basic Game Guide. See Examples 59 and 60.
 EXAMPLE 59: Height Advantage for an attack from a Ladder
Syvarris has a Height Advantage on Shaolin Monk 2 but not on Shaolin Monk 1, so he
adds on extra attack die when attacking Shaolin Monk 2.
 EXAMPLE 60: Height Advantage for defense on a Ladder
The Shaolin Monk has a Height Advantage on Zettian Guard 2 but not Zettian Guard 1,
so he adds one extra defense die only when defending against Zettian Guard 2.
The Flag
The Flag does not have any special powers unless specified in a scenario.
The Conflict Begins
Warehouse Ruin
The Warehouse Ruin is a barrier that figures can hide behind for protection. The Warehouse Ruin has a removable Breakable Wall Section. Figures cannot see or target other figures through a Breakable Wall Section when it is intact. See Example 61.
 EXAMPLE 61: Intact Breakable Wall Section
The Breakable Wall Section is attached to the Warehouse Ruin, therefore Iron Man doesn't
have clear Line of Sight to the Abomination.
Moving over the Warehouse Ruin: Figures are not allowed to move through any Warehouse Ruin tile space occupied by a Warehouse Ruin or the Breakable Wall Section, or move between any two spaces separated by a Warehouse Ruin. This includes moving through the Warehouse Ruin windows. However, you may leap, fly, swing line or use a similar special power to get over these.
Warehouse Ruin Upper Floor Level: The Warehouse Ruin Upper Floor Level is part of the Warehouse Ruin. It is 9 levels higher then the base of the Warehouse Ruin Tile. See Example 62.
 EXAMPLE 62: Height of the Warehouse Ruin Upper Floor Level
The Warehouse Ruin Upper Floor Level has a height of 9.
Only figures can occupy the two hex-shaped spaces located on the Warehouse Ruin Upper Floor Level. These two spaces are used in the same way as any other space, except that no tile pieces may be built directly onto the Warehouse Ruin Upper Floor. See Example 63.
 EXAMPLE 63: Using the Warehouse Ruin Upper Floor Level
Spider Man and Venom use their Swing Lines to reach the Warehouse Ruin Upper Floor
(left picture). Tiles can never be placed on the Warehouse Ruin Upper Floor (right
picture).
The Breakable Wall Section: The Breakable Wall Section of a Warehouse Ruin is a destructible object and can be targeted, attacked, destroyed and removed from play. Rules for attacking destructible objects (like the Fortress Door) are explained here. Note: Unlike the Fortress Door, no player is ever in control of the Breakable Wall Section. Any non-attacking player can roll defense dice for the Breakable Wall Section.
Removing a Breakable Wall Section: If the Breakable Wall Section is destroyed, remove it as shown in Example 64. Figures can now move onto the spaces previously occupied by the wall.
 EXAMPLE 64: Removing a Breakable Wall Section
Remove the Breakable Wall Section by gently pushing it out from the inside of the
Warehouse Ruin and placing it out of the game.
Special Powers
 EXAMPLE 65: Super Strength Special Power
A figure with this symbol (the "S" symbol at bottom of Special Power area of Army
Card) is not affected by the Falling and Major Falling rules. The character is still
affected by the Extreme Falling Rules. A figure with this symbol also ignores any
special power that gives automatic shields to Destructible Objects.
Swarm of the Marro (Swamps)
Swamp Water
Moving onto swamp water: Unlike moving onto water, when you move onto a swamp water space from any other space, you may continue moving if you have moves left.
Moving from swamp water to land: For swamp water spaces that are lower than their adjacent land spaces, the “moving up” rule applies. When moving from swamp water to land, count the side of each land space as you move.
Falling onto swamp water: Unlike water spaces, figures that fall onto a swamp water space may receive wounds. See Falling here.
Marro Hive
Marro Hive Rules: There are a few rules that apply only to the Marro Hive. The Marro Hive may never be moved from its starting location by any special power on any Army Card or Glyph. Figures can never move through a space occupied by the Marro Hive. For example, Shori cannot use her Phantom Walk special power to walk through the Hive. If the Marro Hive was placed on the battlefield by a player as part of his army, when it is destroyed, remove the Hive and the 6-hex swamp water tile base. If the Marro Hive was placed on the battlefield as directed by a scenario, when it is destroyed, remove the Hive and leave the 6-hex swamp water tile base on the battlefield. When placing the Marro Hive, it is always placed on its 6-hex swamp water tile base. When placing the 6-hex swamp water tile base, you cannot create an overhang (no empty space can be under the base). The 6-hex base can only be placed on land tiles. When calculating height advantage against or for the Marro Hive, the swamp water tile base has no height, so consider the Hive to be sitting in the swamp water.
Special Powers
Swamp water is a type of water: A swamp water space is a type of water space. Any special power that applies to a figure on a water space will also work on a swamp water space. For example, a Microcorp Agent's Water special power would work in swamp water.
Ticalla and Laur Jungles
Jungle Pieces (Palm Trees, Jungle Trees and Underbrush)
Moving through a Jungle Piece: Figures are not allowed to occupy or move through Jungle Pieces.
You may remove a Palm or Jungle Tree canopy to access hard-to-reach areas of the battlefield, but you must reattach it afterwards. If a figure cannot fit on a space under a canopy, you cannot remove the canopy to allow the figure to move onto that space.
When moving your figure adjacent to a Jungle Piece, you are allowed to move any of the lower plants of the Jungle Piece that hang over the space that the figure will occupy. A figure may not be placed on any space adjacent to a Jungle Piece if the figure being placed does not fit fully on the space.
Line of Sight: Jungle Pieces may block Line of Sight. Range attacks can be used only when a clear Line of Sight is available between or through Jungle Pieces. See Examples 66 and 67.
 EXAMPLE 66: Seeing Through Jungle Pieces
Sonlen can see the Marro Stinger through the Jungle Pieces.
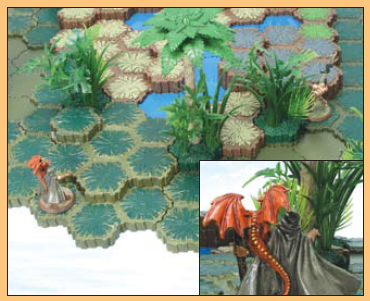 EXAMPLE 67: Not Seeing Through Jungle Pieces
Sonlen cannot see the Marro Stinger through the multiple Jungle Pieces.
Attacking figures adjacent to Jungle Pieces with range: A figure becomes adjacent to a Jungle Piece when it moves next to a Jungle Piece. When a small, medium, or large figure adjacent to a Jungle Piece is defending against a non-adjacent attack, the defending figure receives one additional defense die.
Adjacency Exceptions: Most of the time, if a figure is next to a Jungle Piece, they are adjacent. Here are exceptions to the rule:
- If a defending figure’s base is on a level equal to or higher than the height of a Jungle Piece, they are not adjacent.
- If a figure is next to a space under a canopy, that figure is not adjacent to that Jungle Piece.
- When determining adjacency to a Palm or Jungle Tree, the figure must be next to the trunk of the tree.
See Examples 68, 69, 70 and 71.
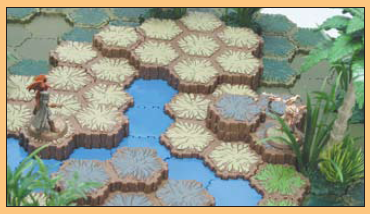 EXAMPLE 68: Defending Against a Ranged Attack
Sonlen is attacking the Marro Drudge. The Marro Drudge (a medium figure) is adjacent
to a Jungle Piece. That Marro Drudge rolls one additional defense die.
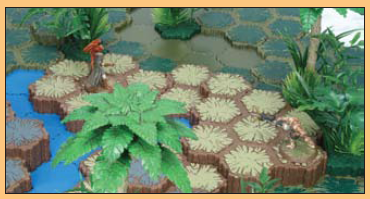 EXAMPLE 69: Height Advantage while Adjacent to a Jungle Piece
Sonlen is attacking the Marro Stinger. The Marro Stinger is adjacent to a Jungle Piece.
The Marro Stinger also has Height Advantage. That Marro Stinger rolls 2 additional
defense dice: one for the Height Advantage and one for being adjacent to a Jungle
Piece.
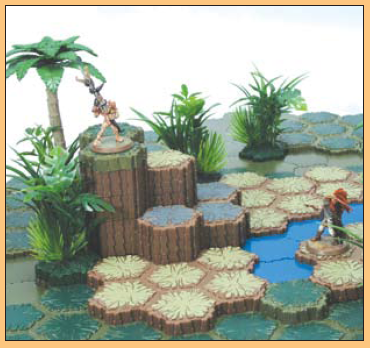 EXAMPLE 70: Height Advantage while Adjacent to a Jungle Piece
Sonlen is attacking the Marro Stinger. The Marro Stinger is adjacent to a Jungle Piece.
The Marro Stinger also has Height Advantage. That Marro Stinger rolls 2 additional
defense dice: one for the Height Advantage and one for being adjacent to a Jungle
Piece.
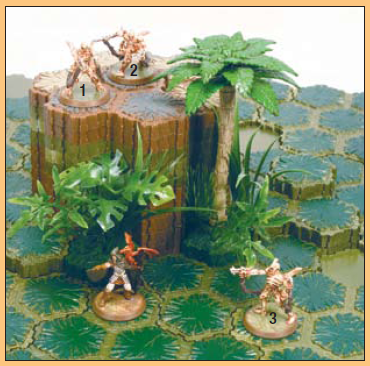 EXAMPLE 71: Adjacent/Not Adjacent to Jungle Pieces
The Underbrush has a height of 9 and the Palm Tree has a height of 14. Sonlen is the
only figure adjacent to a Jungle Piece, because Marro Drudge 1’s base is even with
the Underbrush’s height, and Marro Drudge 2 and 3 are not adjacent to the Palm Tree.
A defending figure never receives more than one additional defense die, even if it is adjacent to multiple Jungle Pieces; however, other factors such as height Advantage may give a defending figure more additional defense dice. See Figure 72.
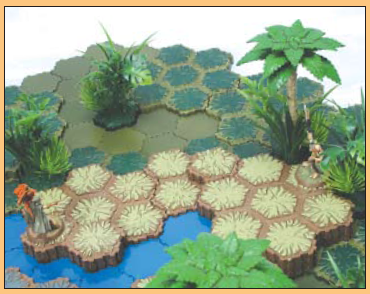 EXAMPLE 72: Defending Adjacent to Multiple Jungle Pieces
Sonlen is attacking the Marro Stinger, which is adjacent to two Jungle Pieces and
has Height Advantage. The Marro Stinger rolls 2 additional defense dice: one for the
Height Advantage and one for being adjacent to multiple Jungle Pieces.
Attacking an adjacent figure: A defending figure adjacent to a Jungle Piece does not roll one extra defense die when attacked by an adjacent figure. See Example 73.
 EXAMPLE 73: Defending Against an Adjacent Attack
When defending against an adjacent attacking figure, Sonlen does not receive an extra
defense die for being adjacent to the Jungle Piece.
Battle for the Underdark
Shadows
Moving onto shadow spaces: Unlike moving onto water, when you move onto a shadow space from any other space, you may continue moving if you have moves left.
Moving from shadow spaces to land: For shadow spaces that are lower than their adjacent land spaces, the “moving up” rule applies. When moving from shadow spaces to land, count the side of each land space as you move.
Falling onto shadow spaces: Unlike water spaces, figures that fall onto a shadow space may receive wounds. See Falling here.
Defending from a shadow space: When a small, medium, or large figure is defending and is on at least one shadow space, that figure rolls 1 additional defense die.
Treasure Glyphs
Depending on the scenario, Treasure Glyphs are placed on top of battlefield spaces either power-side up or symbol-side up (usually symbol-side up). They are normally mobile and can be carried by a Unique Hero. Follow the rules below when using Treasure Glyphs. Some scenarios may break these rules.
- Only Unique Hero figures can attempt to pick up or activate Treasure Glyphs. Remember that Uncommon figures are considered Unique for all special powers and Glyphs. Other figures can land on spaces with Treasure Glyphs on them, but they cannot attempt to pick them up or activate them unless otherwise stated. Note: Any figure may choose to stand on a Treasure Glyph and not activate it or pick it up, preventing others from gaining access to it.
- Treasure Glyphs do not force figures to stop when moving onto them. However, a Unique Hero figure that ends its movement on a space with a Treasure Glyph may attempt to pick it up or activate it, depending on the Treasure Glyph’s individual rule.
- When attempting to pick up or activate a symbol-side up Treasure Glyph, you always roll for a trap before revealing it. You never roll for a trap on a power-side up Treasure Glyph.
- Treasure Glyphs that have been placed on a figure’s Army Card affect only the figure that is carrying them unless otherwise stated.
- Treasure Glyphs cannot be traded between figures. Treasure Glyphs must first be dropped by one figure (either voluntarily while moving, or by the figure being destroyed—see below), and then picked up by another figure at a later time.
- A Unique Hero can carry any number of Treasure Glyphs.
- A Unique Hero can attempt to pick up or activate a Treasure Glyph only during its turn, and can do this only once per turn.
Traps: When one of your Unique Heroes ends its movement on a Treasure Glyph that is symbol-side up, you may attempt to pick the Treasure Glyph up or activate it (depending on the scenario). If you do, that figure might be caught by the scenario-specific trap. Roll the 20-sided die.
- If you roll a 1–5, you set off the trap. Leave the Treasure Glyph symbol-side up. The scenario-specific trap takes effect.
- If you roll a 6 or higher, you did not set off the trap, and the figure that landed on the Treasure Glyph now picks up or activates the Treasure Glyph. Turn the Treasure Glyph power-side up, remove it from the battlefield, and place it on the figure’s corresponding Army Card (unless otherwise stated in the scenario). That figure now controls that Treasure Glyph.
Note: If the figure has a special power that activates after movement, the controlling player decides whether to use it before or after dealing with a Trap. You do not roll for a trap when landing on a Treasure Glyph that is power-side up.
Dropping Treasure Glyphs: At any point during a figure’s movement, you may announce that the figure is dropping a Treasure Glyph. Announce which Treasure Glyph the figure is dropping, and place it power-side up onto a space the figure currently occupies. That figure may now continue its movement. Note: You cannot drop a Treasure Glyph onto a space that already has another Glyph or Treasure Glyph on it.
Losing Treasure Glyphs: If a figure that is carrying a Treasure Glyph is destroyed, the Glyph is placed power-side up onto a space the figure last occupied. If the space (or spaces for double-space figures) already has a Glyph or Treasure Glyph on it, the Treasure Glyph the figure was carrying is removed from the game. If a figure that is carrying more than one Treasure Glyph is destroyed, that controlling player can choose which Treasure Glyph to place on the space that figure occupied. Once each space the figure occupied has a Treasure Glyph on it, the remaining Treasure Glyphs (if any) are removed from the game. If a figure with one or more Treasure Glyphs is on a ladder rung when it is destroyed, remove all Treasure Glyphs it was carrying from the game.
Permanent Treasure Glyphs: The power of each permanent Treasure Glyph is in effect for as long as a figure carries it. Exception: The Brandar’s Chest Treasure Glyph is an artifact. It usually represents an object as directed by the specific game scenario.
Temporary Treasure Glyphs: The power of each temporary Treasure Glyph takes effect at a time of your choosing, so choose wisely. A figure must be carrying the Treasure Glyph to activate its temporary effect. Once the effect completes, the Treasure Glyph is removed from the game.
Ancient Artifact Treasure Glyphs: Ancient Artifacts are powerful and rare Treasure Glyphs. Ancient Artifact Treasure Glyphs follow all rules for Treasure Glyphs with the following exception: An Army may control more than one Ancient Artifact Treasure Glyph, but an Army can never control more than one copy of each Ancient Artifact Treasure Glyph. If at any point an Army would control more than one copy, all extra copies must be dropped or destroyed.
See the Glyphs table for a complete list of Glyphs and Treasure Glyphs.
Battle for the Wellspring
Wellspring Water
Use the following rules for wellspring water spaces: At the befinning of a round, you may roll the 20-sided die for each Hero you control on a Wellspring water space. If the result is 12 or higher, that Hero may remove 1 Wound Marker from its Army Card. If the result is a 1 or 2, that Hero becomes confused by visions and suffers 2 wounds.
Wellspring water is a type of water, and follows all normal water rules in addition to the rules described above.
Age of Annihilation
Laur Walls
Moving over Laur Walls: The Laur Wall pieces are 10 levels high. In order to climb over a Big Laur Wall Section using normal movement, a figure would need a move number of at least 11 to get onto the other side, and the figure's height would have to be higher than 10 in order to move over it.